
 |
| "If the Hat Fits" from the Buggy Barn book, Frightfully Crazy |
Here's a way to pretend you went to all the work of adding piping to your binding without all the effort. "If there's an easier way...", that's my motto. This is also an easy finish for a lone UFO block - Make a pillow!
Cut:
Cut:
1-1/4" x width of fabric strips of main print - what you'll see as the outer binding print.
1-1/2" x wof strips of accent print for flange/piping (NOTE: 1/4" difference creates a 1/8" flange)
You'll need 1 or 2 strips for a pillow, 5-6 strips for a baby quilt, 6-8 for a lap quilt, 8-10 for a twin/queen and 10 to 12 strips for a king size quilt.
OR ...
Want to know how to precisely calculate yardage for any binding? Here's the Mathematical Formula:

1) STITCH all 1-1/4" main print strips together, end to end, using a diagonal seam to join, pressing seams open. Repeat for all the 1-1/2" accent print strips

You'll need 1 or 2 strips for a pillow, 5-6 strips for a baby quilt, 6-8 for a lap quilt, 8-10 for a twin/queen and 10 to 12 strips for a king size quilt.
OR ...
Want to know how to precisely calculate yardage for any binding? Here's the Mathematical Formula:
* Measure the perimeter of your project and add 12 inches for mitered corners and final seam.
2 x (W + L) + 12 = P
* Divide that number by 40" (usable inches of width of fabric) to calculate the number of strips to cut; rounding up to the nearest whole number.
P / 40 = N
* Multiply that number by the width of strips desired to get the yardage amount. In this case:
N x 1-1/4" or 1-1/2" = Y
* Round up to the nearest 1/8 yard (0.125) or 1/6 yard (0.167)
Yardage Decimal Conversion Inches
You're welcome! Now, let's make it!
1) STITCH all 1-1/4" main print strips together, end to end, using a diagonal seam to join, pressing seams open. Repeat for all the 1-1/2" accent print strips
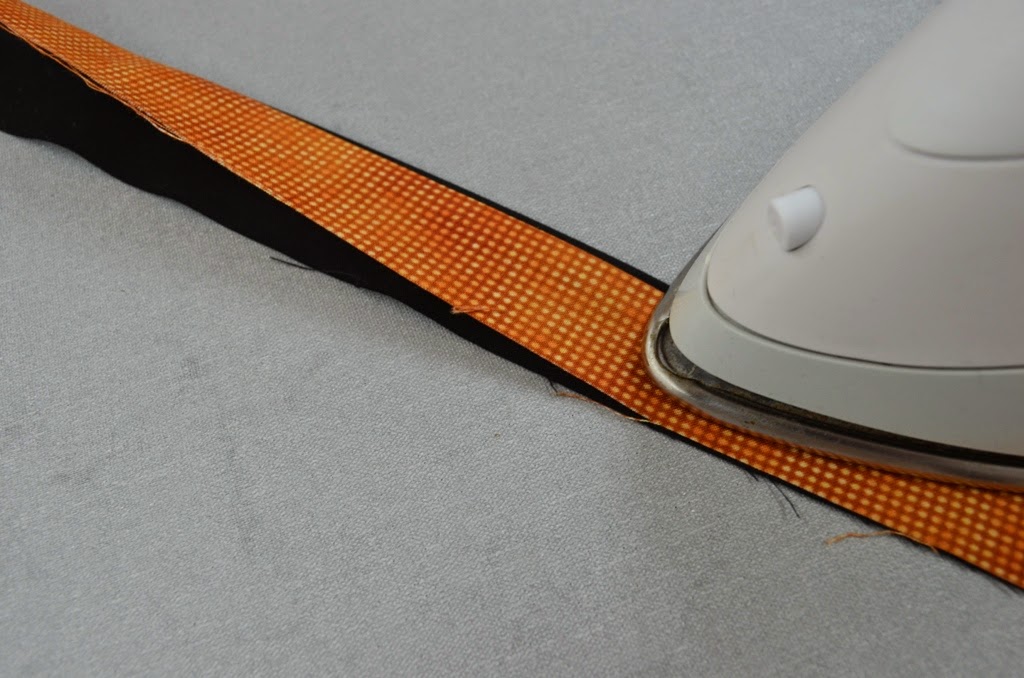
2) STITCH to join both long strips together, using a 1/4" seam allowance. This makes your binding 2-1/4" wide. Press seams toward the main print, unless you want to fill your "piping", then press toward the accent color. You may want to trim seam to 1/8".

3) PRESS pieced binding in half, lengthwise. See how the accent color peeks over at the folded edge? YAY!
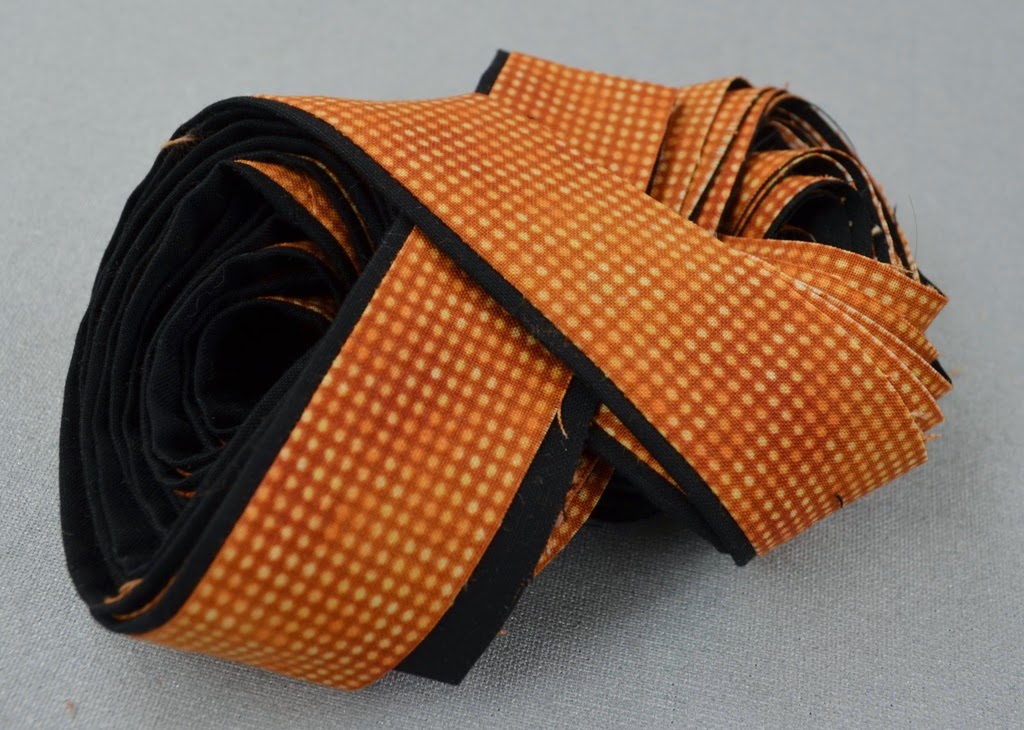
Tuck the end in the back, and it will stay in place until needed.
Pull binding out of the center and it's ready to apply to the quilt.

If it's rolled like this, the binding doesn't twist or roll away.

5) MITER the corners as usual. Stop stitching at 1/4" from the corner. Remove from the sewing machine and clip threads. Fold binding up to the corner at a 45-degree angle ↓.

Fold binding back down, keeping the folded edge evenly aligned with the previous corner, and realigning raw edges together ↓. Begin stitching at the folded edge and continue around the quilt, mitering at each corner.

6) FINISH the final mystic seam joint for a continuous, non-lumpy binding. Here's a link to the tutorial: Binding Tutorial < or see in in my first (self-conscious, terrified) VIDEO <.
7) Bring binding around to the front of the quilt and PIN the corners to form identical miters.
.JPG)
8) STITCH in the DITCH. Pivot at the corners.

I'll sometimes use a stiletto or seam ripper to hold the binding in place as I stitch.
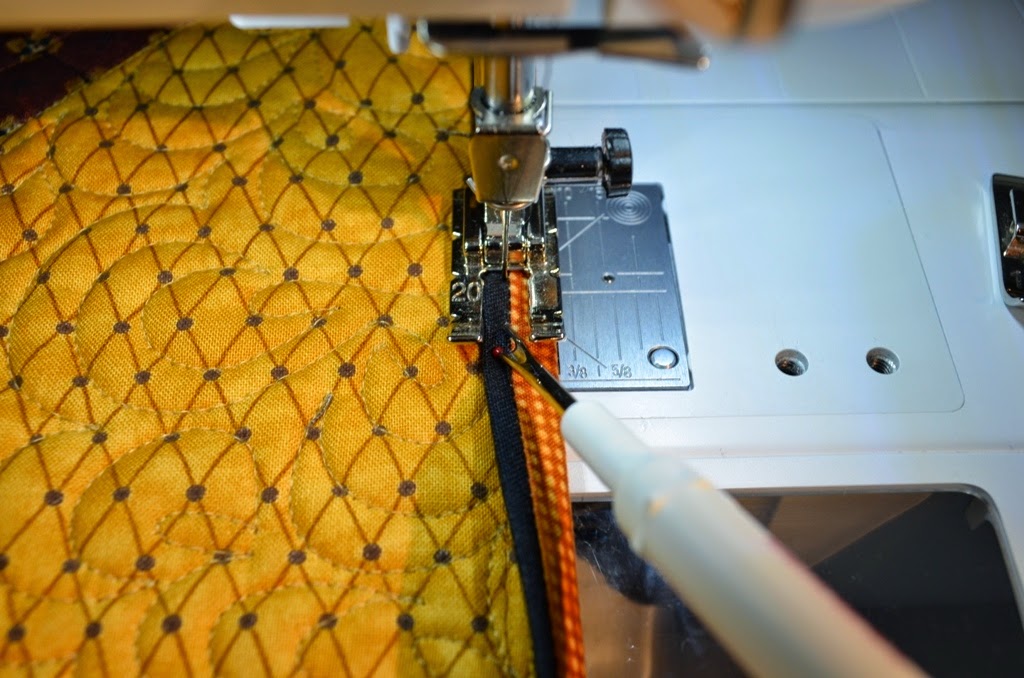
I've recently tried using those Clover Binding Clips, and those seem to work well too. OR - skip the pins and the clamps and just get out the glue stick! That works as well as anything!
Overlap beginning stitches, and you're finished!


I love my Hand sewn bindings but I could do this on a Baby quilt that I need by November...Thanks for the tute!
ReplyDeleteBrilliant! I love this finish and just so happen to have a pillow top waiting in the wings. I'm definitely going to give your faux piping a go! Thank you for the tute :)
ReplyDeleteOh, Deonn. You have done it again. Another clever way to make a spectacular binding. Plus, the trick to roll binding...genius! Thanks so much.
ReplyDeletefabulous clap clap clap...a perfect tut...i think I will do this on my gingham quilt I am working on now....
ReplyDeletelove the theme...such a lovely witch
Deonn, first of all, thank you so much for stopping by my blog today and leaving your kind comment! I'm so glad that I was able to find your quilting blog just from your sweet visit! I am a quilter and love it beyond words! I am looking forward to all of your quilting tips and design ideas!
ReplyDeleteHappy quilting and also buon appetite!
xo
Roz
Thank you sew very much for sharing your brilliant faux piping tutorial. Your Witch pillow is sew cute with her legs dangling. Creative Stitching Bliss...
ReplyDeletethanks for a wonderful tutorial, looks so good on the pillow, very classy and your instructions could not be clearer.
ReplyDeleteI've done that on a quilt in the past and I liked the way it turned out. I'll definitely be doing it again.
ReplyDeleteneat binding, I usually sew to the back, and use 2 1/2" strips, is yours 2 1/4" ?? seem like it, if I did the math right.
ReplyDeleteThanks, Bea! Yes, this makes the binding strip 2-1/4" wide, which is perfect for using my 1/4" presser foot with the guide on the side. That way, I get a really consistent seam width when stitching through all the bulk of the quilt and binding. When I use this machine-finish technique, it's on a quilt that I'm not concerned about how the stitches line up on the back. But it usually works out pretty well.
DeleteGreat tutorial! I love learning something useful and beautiful and new!
ReplyDeleteNice! I'm going to try it for reals this time!
ReplyDeleteThis is really well written. Thanks! Using it right now on a UFO Christmas quilt!
ReplyDeleteI love this idea. I wondered how it would work with the inside seam allowances for 2 1/4” wide. Thank you so much. Plan on trying out today.
ReplyDeleteCould you use ribbon as an accent?
ReplyDelete