 |
| Kaleido-Medallion with "Practically Perfect" Paper-Pieced Pretty Points! |

Welcome! Let's have some adventures with quilting! (& sewing!)
Showing posts with label Tricks and Tools. Show all posts
Showing posts with label Tricks and Tools. Show all posts
Thursday, August 3, 2023
Practically Perfect Paper-Piecing! A Tutorial + Tips
Tuesday, April 18, 2017
Oh, Happy Day!
 |
| Happy Tulips quilt by Deonn Stott, 48" x 62" featuring Happy Day fabric by Lori Whitlock for Riley Blake Designs |
Monday, August 29, 2016
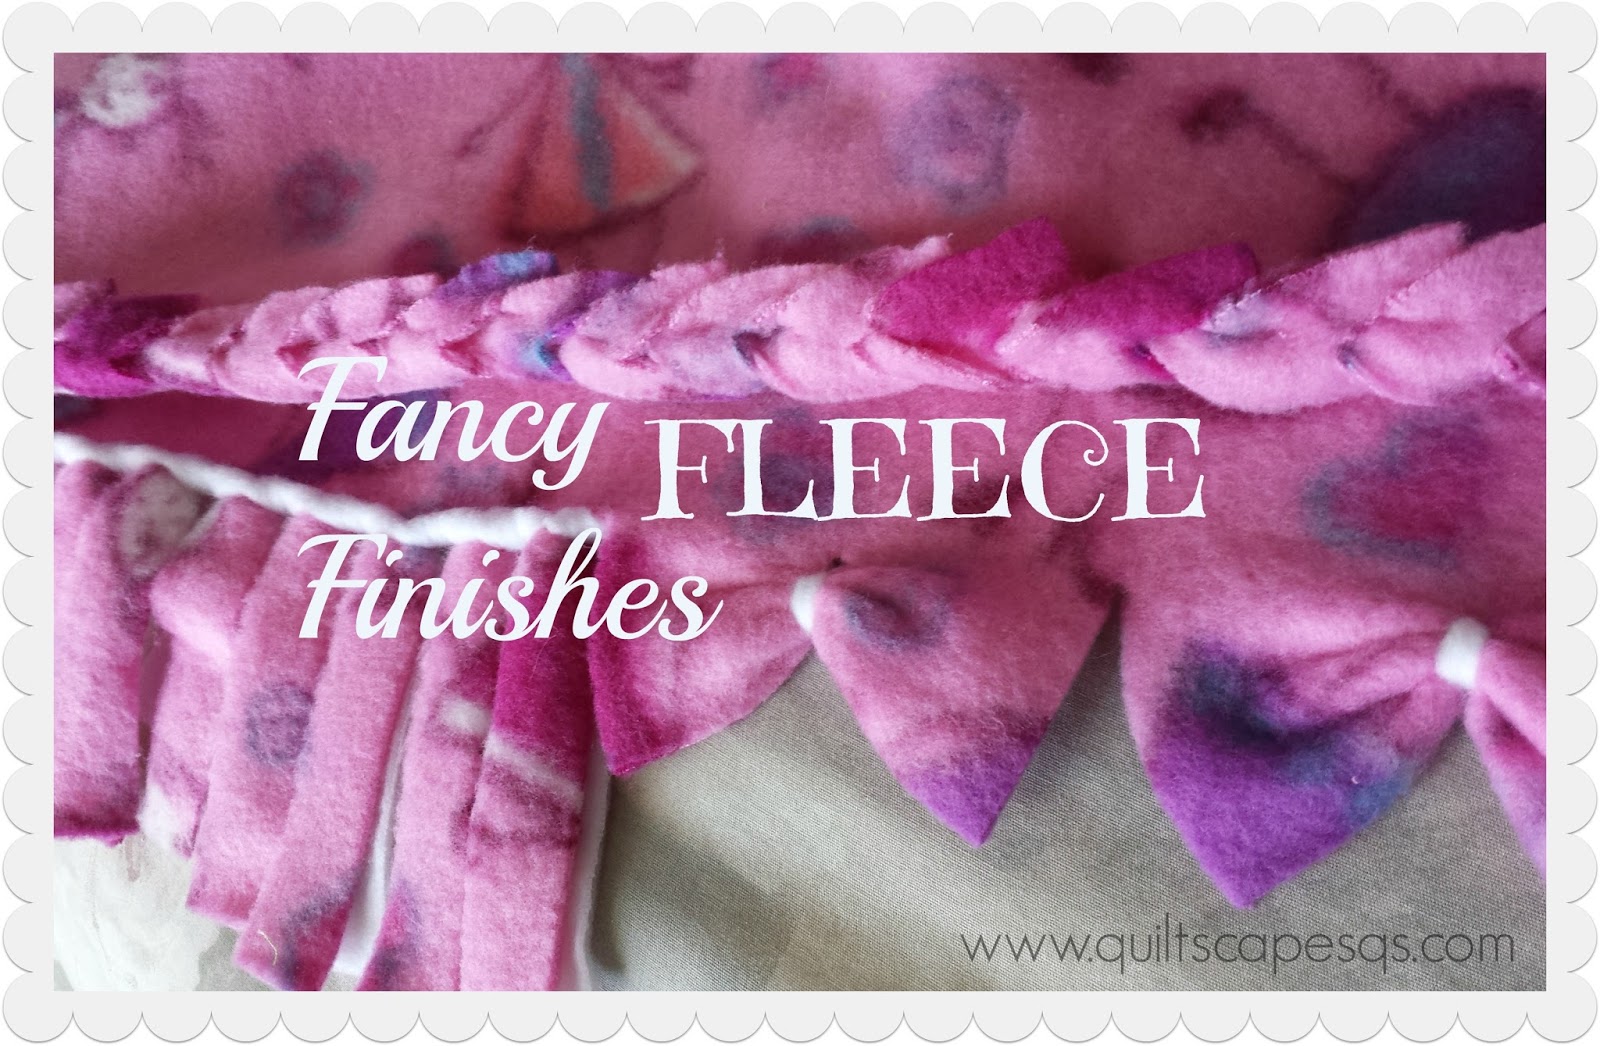
Fancy Fleece Finishes + Fleece "Yarn" Tutorial!
I know this is a quilting blog, but sometimes, you just need a quick, easy, no-sew blanket or project! And sometimes fleece is the answer. Lightweight and warm, a few snips and clips, and it's ready to go!
Thursday, March 24, 2016
OLFA Designer Spotlight


The folks at OLFA invited me to participate in a Designer Spotlight, to make a project using a few of their products. The Olfa company invented the very first rotary cutter in 1979. My Olfa 60-mm cutter with the retractable blade is one of my very favorite tools in my sewing kit. You can read all about it here: OLFA-Designer-Spotlight-Deonn-Stott
Saturday, March 12, 2016
As the Fur Flies... Quilts & Comforters

I love the texture and feel of cuddly plush fur fabric, a.k.a. "Minky". This soft-as-mink (hence the name) polyester fabric is finding its way in to more and more quilts. I'm guessing the name "minky" is now synonymous with all brands of this type of product because that was the first brand available - much like we call all tissues "Kleenex". There is a huge variety of colors, designs, textures, stretchiness and quality of this stuff. I especially love it for backing on baby quilts and lap throws, as it comes 60-inches wide. My preference is Cuddle Soft - I can always find the color I need, and can depend on the quality. It's not as stretchy as other brands I've tried, so it works beautifully for longarm quilting. That sounds like a commercial - but as always, it is my own, unsolicited opinion. And kids (big kids too, lol!) just can't keep their hands off! Here are some samples.
Best Tips for sewing with Plush Fur (Minky)
 |
| PRINTER-FRIENDLY |
Here are my best tips for sewing with this cuddly plush fur fabric; cutting, pinning, sewing, pressing, quilting, binding, care and cleaning.

1) Cutting: Use a rotary cutter with a sharp blade, a mat, and a long ruler for better, straighter cuts. You may get a little fur flying after each cut, so gently scoop up the fabric then shake it out over a garbage can, or take it outside to shake it off! Use a piece of batting, a dry washcloth or your hand to wipe off the little bits of fur left on the cutting board. Then get out the broom, dust-buster or vacuum to get the rest off the table, floor, your hair, your clothes, the bottom of your socks…

My hubby had a good laugh as he came down to the sewing room and snapped this pic.
2) Pinning: Face it, this stuff is so soft it’s slippery! Basically, pin it to death. This stuff also has a "nap", especially noticeable with a shorter length of fur. Feel it with your hand to determine which direction you want the nap to run. One direction is smooth, and the opposite direction will make the pile stand up against the grain. If pinning is not sufficient, try using a glue stick to baste edges together.
3) Sewing: Use a bit larger needle, size 90/14, ballpoint. For stitching, refer to #2. Pin, pin, pin. Remember the nap? This stuff will often slide in the direction of the nap. When stitching two layers together, it helps if the nap is traveling in the same direction. If you are sewing minky to a layer of cotton, put the minky on the bottom so the feed dogs can do their job. Sew slowly and carefully so as not to stretch the edges. You may need to tuck in the furry ends so you can easily see to line up the edges. And, if you happen to have a walking foot with upper feed dogs to help feed the fabric under the needle evenly with the lower feed dogs, you will have even better luck sewing this stuff. If you are piecing large pieces together, say for a quilt backing, stitch along the lengthwise grain if possible, as it has less stretch. Again, check the nap, then pin, pin, pin! Or go and buy the 90-inch stuff for your backing, relatively new on the market.

4) Pressing: NOT recommended. Since this product is polyester, it should be relatively wrinkle-free. Don’t iron directly. Press from the back with a damp press cloth or piece of muslin. If you iron on the front, you may end up with an iron-shaped imprint. Also, try to resist ironing super-textured plush fur such as dimple dots or rosebuds, as ironing will flatten out the texture. Trust me.*Ü* You may also throw it in the dryer with a damp cloth on low heat for about 10 minutes to release the wrinkles.
5) Quilting: I admit, I love quilting with this stuff because it really shows off the machine-quilting! I also prefer to quilt a little less densely so the loft can come through and be truly cuddly, like a warm hug from grandma. When setting up for longarm quilting, keep the lengthwise grain (selvage edge) at the sides with the stretchy cross-grain pinned at the top and bottom. Use lots of pins, with minimal space in between, say every 1" to 1-1/2". Make sure the nap is vertical, heading from top to bottom of the quilt, so when you take up the quilt you're not going against the grain. If quilting on a domestic machine, spray-baste or pin-baste your layers together and quilt using a walking foot. For free-motion quilting, drop the feed dogs and use a darning foot. Quilt with confidence, you'll love the result!
6) Binding: Quilts using plush fur may be bound with regular double-fold cotton binding, single strips of minky, or self-bound by bringing the backing around to the front.

This binding ↑ is made with 2" single-layer strips. Join the strips to make the length you need, then apply to the back of the quilt using a 1/2" seam allowance. The corners are mitered, and the binding is brought around to the front and machine-stitched using a serpentine stitch. See my plush fur binding tutorial HERE.

Again, a walking foot is very helpful. When applying the binding, be careful the quilt doesn't stretch too much on the stretchy edges, then be careful the binding doesn't stretch too much on the lengthwise edge.
7) Care & Cleaning: This product may be washed and comes out just as luscious as before it went in the washer. It doesn't shrink or fade, pill or shed. Machine-wash cold, tumble-dry low, or hang to air dry. Do NOT use fabric softener. Instead, a dryer sheet is sufficient to take out any static. Keep it clean and it will last forever.
Happy Sewing!

Friday, December 4, 2015
Christmas Hot Pad - FREE Pattern
Need a quick project for Christmas gifts or a festive decoration for the kitchen? This terrific "Quilt-as-you-go" stained glass applique' hot pad/mug rug may be just the ticket!


Reposted from my "Twas the Night" holiday blog hop here.
Friday, November 20, 2015
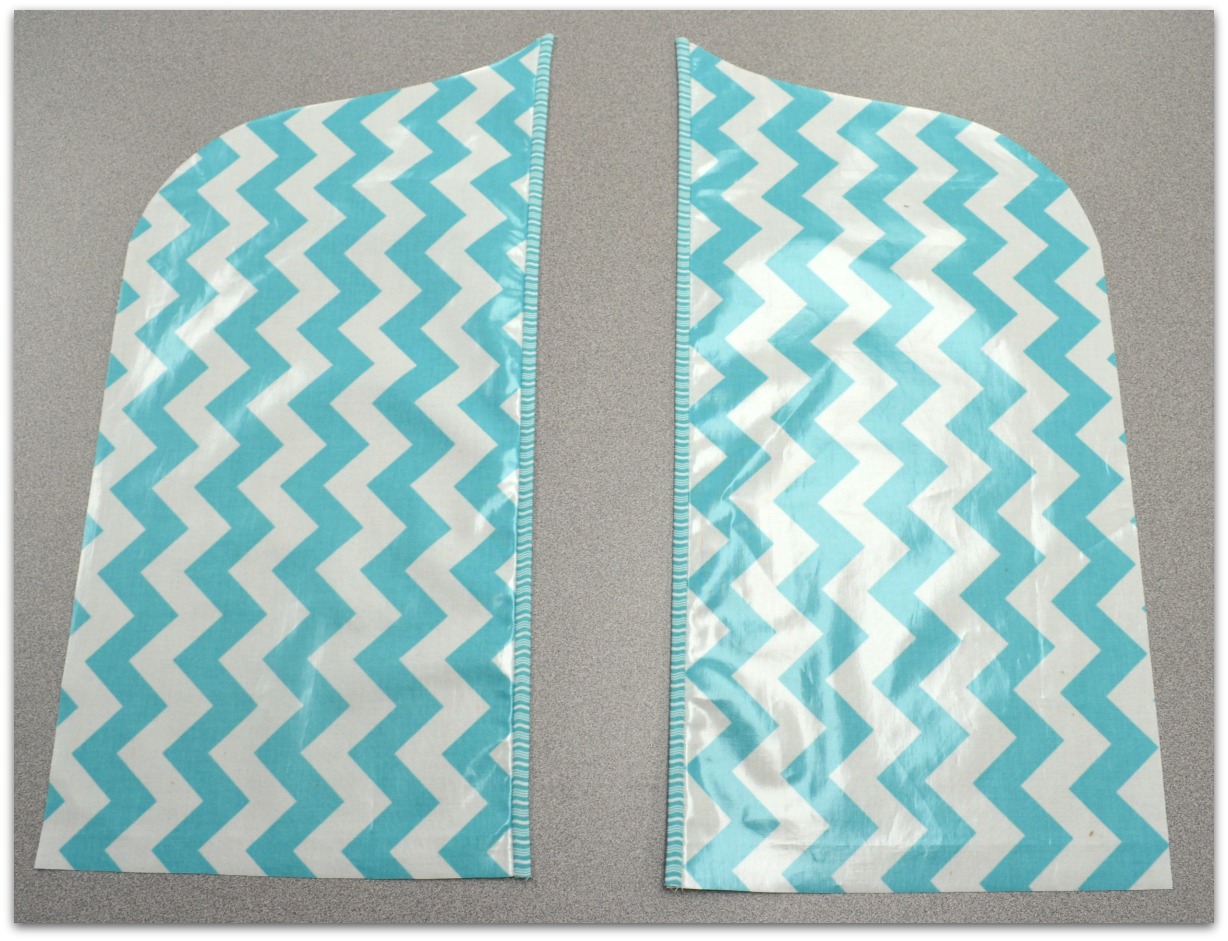
Diaper Changing Pad

A couple of new babies are set to join our extended family soon! Here's a quick little project that's perfect for the new Mommas.

I used Riley Blake Designs' Aqua Chevron laminated cotton with Auqa Crimp coordinating cotton for the binding. The laminate cleans up easily with a damp rag. If you've never sewn with laminate before, see my Top 5 Tips in the previous post, or click the button for the print-friendly instructions.
Diaper Changing Pad
Supplies:
1 yard cute Laminated Cotton Fabric
Cut 1@ 27" x 22" rectangle, 1@ 11" x 22" rectangle and 2@ 9" x 22" rectangles
11" x 22" piece batting or Pellon 987f Fusible Fleece
5/8 yard binding
Cut 6@ 2-1/4" bias strips for binding (see Bias Binding tutorial HERE)2" to 3" Velcro sew-in hook and loop tape
Matching thread
Diapers and wipees, etc.
Instructions:
Step 1) TRIM. Round the top and sides of the 27" x 22" rectangle as pictured.

Step 2) CENTER SECTION. Adhere fusible fleece or batting to the
11" x 22" rectangle, center on wrong side of the large piece,
then trim the top edge to match and baste all edges in place with 1/4" seam.
then trim the top edge to match and baste all edges in place with 1/4" seam.

Step 3) SIDE PANELS. Trim top edges of the 9" x 22" side pieces
to match the back. Machine-bind the straight inner edges.
to match the back. Machine-bind the straight inner edges.
Apply binding strips to laminate side, using 1/4" seam allowance.
Fold binding to back and "stitch in the ditch" to finish.
Fold binding to back and "stitch in the ditch" to finish.

Pin or baste side panels in place, overlapping center section.

Step 4) POCKETS. Measure up from the bottom about 8 inches, mark a line
then stitch from the outside edge to the binding; backstitch at the end.
Repeat at another 8" width as pictured, then pivot alongside
the binding edge and stitch in the ditch to the upper edge.
Repeat to create pockets on the other side.
then stitch from the outside edge to the binding; backstitch at the end.
Repeat at another 8" width as pictured, then pivot alongside
the binding edge and stitch in the ditch to the upper edge.
Repeat to create pockets on the other side.

Step 5) BINDING, CLOSURE. Apply binding around
the outer edges by machine, as before.
the outer edges by machine, as before.

Stitch a strip of Velcro (the soft loop section) at the top inside edge.

Step 6) GO! Fill the pockets with diapers, a small packet of diaper wipes,
baby lotion, powder, goggles, nose plugs, clothes pins,"Poo-Pouri", etc. ;)
baby lotion, powder, goggles, nose plugs, clothes pins,"Poo-Pouri", etc. ;)

Fold sides over center,


Fold the bottom up,

Fold flap down to determine where to stitch
the corresponding Velcro section, then stitch it long-ways,
so if it's more or less bulky it may still be secured.
the corresponding Velcro section, then stitch it long-ways,
so if it's more or less bulky it may still be secured.
Ready to Go!

A little sweetness for those on-the-go diaper-changing (life-changing) experiences! Now, just a couple more "pink" ones, and I'll be set!
For more gift ideas and laminate projects, please visit my Snippets page.
Happy sewing!
For more gift ideas and laminate projects, please visit my Snippets page.
Happy sewing!

Top 5 Tips for Sewing with Laminates!

Here are my TOP 5 TIPS for sewing with laminates.
1) YES, You can PIN laminate!

Use fine pins like these glass head patchwork pins for the best results. You can reduce pin holes by spritzing the back lightly with water, then pressing on the cotton side. If you prefer not to use pins, try paper clips, or use binding clips. Or you could use a glue stick or maybe double-stick fabric tape (works perfectly for zipper installation!) as an alternate method of holding your fabric in place while you stitch.
2) YES, You can PRESS laminate!


Use a slightly cooler-than-normal iron, press from the back, or use a press cloth (a square of muslin works well) when pressing on the laminated side. You can use a little spritz of water or a bit of steam. Just don't overdo or you will dull the laminate coating.
3) YES, You can FUSE laminate!


Fusible products can adhere to the wrong side of the laminate. Follow the manufacturer's directions and press for about 7 seconds at each spot, overlapping the iron and using a little steam. Be careful not to over-press as it can reduce the adhesive properties of your fusible product. I used Pellon 987F fusible fleece to make my UFO-to-Go portable design walls and my Pack-Along Picnic Quilt.
4) YES, You can SEW laminate!
 Many sewing machines offer a Teflon foot for use with vinyl and laminates, which helps the foot glide over the laminate without pulling. Depending on the machine, the price can range from 45 cents to 99 dollars!

If you don't have a Teflon foot, try putting some removable painter's tape over the bottom of the foot. That has worked well for me. Use a pin to poke a hole where the needle goes.
Another option is to lay a sheet of paper tissue over the top and stitch through the tissue. Tear off the tissue when the seam is complete.

Here's another option - rub a tiny dot of machine oil on the bottom of the regular presser foot. Then just wipe off the laminate when it's stitched.
Another option is to lay a sheet of paper tissue over the top and stitch through the tissue. Tear off the tissue when the seam is complete.

Here's another option - rub a tiny dot of machine oil on the bottom of the regular presser foot. Then just wipe off the laminate when it's stitched.
Use a new, sharp needle in the sewing machine. Set stitch length between 2.5 and 3.0. Try not to "re-sew" too many times. Polyester or cotton-poly thread seems to have less breakage than 100% cotton thread.
If you are having trouble feeding the laminate through the machine or if it's sticking on the sewing machine bed, here are a couple more ideas:
1) Lift the fabric off the machine bed slightly so it comes in contact with the machine only at the feed dogs/presser foot. That has worked well for me.
2) Try sprinkling a little corn starch or baby powder on your hands, then wipe your hands over the sewing machine bed to reduce the "stickiness".
5) YES, you can CLEAN laminate!
The laminate coating will wipe clean with a damp rag. You can also hand-wash and air dry. Best not to throw it in the dryer as the heat may dull/diminish the vinyl coating.
PRINT-FRIENDLY INSTRUCTIONS
PRINT-FRIENDLY INSTRUCTIONS
Deonn

Subscribe to:
Posts (Atom)