Hi, and welcome to my stop on Riley Blake Designs' Hesketh House Collection showcase!
Hesketh House is manufactured by Liberty of London, and Riley Blake Designs is the exclusive US distributor for Liberty Cotton. Isn't this exciting? You may have already sewn with Liberty's Tana
Search This Blog
Showing posts with label Vintage. Show all posts
Showing posts with label Vintage. Show all posts
Thursday, January 10, 2019
Wednesday, January 25, 2017
Shall We Gather... in the Kitchen?
In preparation for an upcoming class where I'll teach the vintage art of Smocking, I've just added this sweet little apron pattern to my Etsy shop.
If I wear it around the house, my girls call it my "Little Old Lady" apron. Haha, I love it! New fabrics, vintage technique, it brings to mind memories of my Mom, Grandma or Great-Grandma in their respective kitchens. My foremothers all wore aprons on a daily basis!
Want to give smocking a try? Here's the TUTORIAL. And you can find the pattern for this adorable, sweet, smocked "little old lady" apron on my Etsy Shop HERE.
Ginghams seem to keep rising to the surface lately, and you can find a whole realm of gingham prints and wovens in varying sizes out there. Pine Needles carries RBD Gingham in every color and size imaginable. Just spreading the Gingham Love!♥
Ginghams seem to keep rising to the surface lately, and you can find a whole realm of gingham prints and wovens in varying sizes out there. Pine Needles carries RBD Gingham in every color and size imaginable. Just spreading the Gingham Love!♥

Monday, October 6, 2014
Hand-Stitchery: Edge Finishes
Blanket & Buttonhole Stitches!
Today's vintage stitchery lesson is one of the very most practical, basic stitches: the Blanket Stitch. It makes a great finish on applique' or the edge of a blanket (hence the name). We'll try this simple stitch plus a couple of variations, then try her cousin, the Buttonhole Stitch.
Tuesday, September 2, 2014
Cross-Stitch Kids & a Gingham Hop!
Ohmigoodness! I've been giggling all day. I've recently been scouring through the interwebs trying to find a cross-stitchery pattern for what I had in mind for this month's tutorial for Riley Blake Designs' Cutting Corners.
Do you like my triplets? ↑↑. I used to dress my girls alike (see their picture on the sidebar), and made most of their clothes. Yes, I was that mother, I admit. So, I found several patterns from old 1960's Coats & Clarks cross-stitch brochures and combined a few ideas to make up my own little girlies. I've tried to give them legs, knees, all kinds of things, but nothing looked quite right! What do you think? The boy version has legs, but they're his pants, and the girls just didn't look good in pants with their little dresses... sheesh. So we'll have to imagine they have legs, with their little gingham knees... And you can find the link to the FREE PATTERN and tutorial below.
 Speaking of gingham... It's been a summer of sewing over at Sew We Quilt - and as part of Madame Samm's "Save the Gingham!" campaign, she created a "See You in September" blog hop. Participants will show three things made this summer, including something with gingham checks. The hop starts tomorrow! Shari is our illustrious cheerleader for this round - I'll join the crowd on Sept 11th. Check out the master list HERE. Oh, I do love gingham, and can't wait to see everyone's creations! By the way, RBD IS saving their gingham - but they're focusing more on the 1/4" size now, rather than the 1/2" or 1/8" size checks.
Now, if you'd like to make your own little gingham cross-stitch kids like the little cuties above (yes, there's a boy pattern too) check out my tutorial HERE and download the FREE PATTERN. Then you can make a little row of Cross-Stitch kids and giggle along with me too...
Happy Stitching!
Do you like my triplets? ↑↑. I used to dress my girls alike (see their picture on the sidebar), and made most of their clothes. Yes, I was that mother, I admit. So, I found several patterns from old 1960's Coats & Clarks cross-stitch brochures and combined a few ideas to make up my own little girlies. I've tried to give them legs, knees, all kinds of things, but nothing looked quite right! What do you think? The boy version has legs, but they're his pants, and the girls just didn't look good in pants with their little dresses... sheesh. So we'll have to imagine they have legs, with their little gingham knees... And you can find the link to the FREE PATTERN and tutorial below.
 Speaking of gingham... It's been a summer of sewing over at Sew We Quilt - and as part of Madame Samm's "Save the Gingham!" campaign, she created a "See You in September" blog hop. Participants will show three things made this summer, including something with gingham checks. The hop starts tomorrow! Shari is our illustrious cheerleader for this round - I'll join the crowd on Sept 11th. Check out the master list HERE. Oh, I do love gingham, and can't wait to see everyone's creations! By the way, RBD IS saving their gingham - but they're focusing more on the 1/4" size now, rather than the 1/2" or 1/8" size checks.
Now, if you'd like to make your own little gingham cross-stitch kids like the little cuties above (yes, there's a boy pattern too) check out my tutorial HERE and download the FREE PATTERN. Then you can make a little row of Cross-Stitch kids and giggle along with me too...
Happy Stitching!
Hand Stitchery: Gingham Cross-Stitch

I am excited to share this installment of vintage hand-stitchery tutorials for Riley Blake Designs' Cutting Corners, using RBD's cute gingham prints!
Monday, August 4, 2014
Hand Stitchery Primer
Today's "Sewing Basics" tutorial/demonstration is a handful of the very most basic hand-embroidery stitches. Stitch out a sampler block or make a cute quilt block, name tag or label, or make a fancy Needlenook to carry your stitchery supplies.
Tuesday, July 8, 2014
Shall We Gather IV - Ruching!
Welcome to today's Cutting Corners tutorial for Riley Blake Designs. We'll create dimension and texture in quilting and sewing projects with Ruching!

Here's another great vintage technique made modern!
I learned to sew from my mother, tied my first quilt at around age 8, and have spent many hours (days, years, decades...) in the sewing room with Mom, sisters and eventually my own children. I offer professional longarm quilting services at Quiltscapes Quilting, where I also teach quilting and sewing classes in my "Quilt School".


That was a little tight for my taste, so I lengthened it to 18", 1/2 the length of the ribbon. Smooth out the gathers to make scallops even, then knot the end and clip the thread.




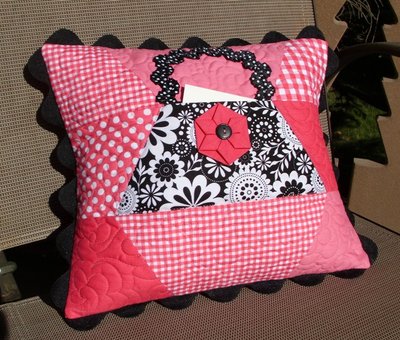 Purse handle in this PJ Pillow (see TUTORIAL)

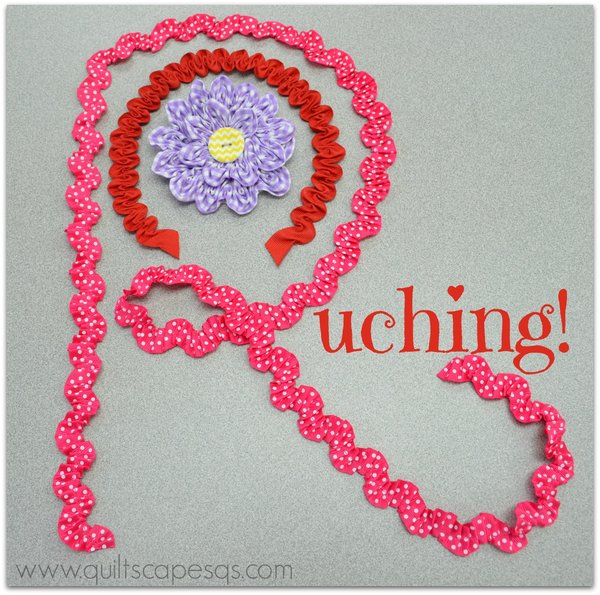

Here's another great vintage technique made modern!
I learned to sew from my mother, tied my first quilt at around age 8, and have spent many hours (days, years, decades...) in the sewing room with Mom, sisters and eventually my own children. I offer professional longarm quilting services at Quiltscapes Quilting, where I also teach quilting and sewing classes in my "Quilt School".
I love to dream, design, learn, make and teach all things quilty. It's my personal quest to always look for budget-saving ways to simplify the process!
Thanks for joining me for this final installment of my "Shall We Gather?" tutorial series. Just in case you missed one, here are the links:
Now, let's rush on to RUCHING!!
First, a definition:
ruche or rouche (pronounced "roosh"): French sewing term which means to gather, ruffle or pleat in a repeating pattern to form ruffles, scallops or petals; A strip of pleated, fluted or gathered piece of fabric used for trimming.
And for us today... it's just another cool gathering technique with a fancy name!
Supplies:
1 yard 5/8" ribbon, a 2" strip of fabric, cut width of fabric or on the bias (45-degree), needle and matching thread, marking instrument, 3" circle of felt or felted wool, pin back or clip, hot glue gun and glue sticks.
~~~
RUCHED RIBBON
For measuring purposes, ruching will reduce the length of your ribbon by half at the least, and up to 3/4 at the most. Calculate 2 x the desired length for a loose gather, or 3 to 4 x the length for a tight gather if desired.
With a removable marking pen or other instrument, transfer a zig-zag pattern on the right side of a piece of ribbon. Click here >> PRINTABLE TEMPLATE

In order to trace, I trimmed the outline of the corresponding size for my 5/8" ribbon.

I actually used my Pounce chalk dust powder puff to mark mine. Saves time, and I just wiped off the table.

Thread a large-eye needle (crewel embroidery or milliner's, size 9 or 10) and knot the end. Use strong, sturdy, thread, single- or double- threaded through the needle. The length of thread to use is the length of your ribbon.
Beginning at one end of the ribbon, take a running stitch along the drawn pattern, using 1/8" to 1/4" running stitches. This can also be done on the machine, as long as the pattern is consistent. By the way, the chalk dust stayed put long enough to stitch along the marked lines, then I brushed it off to continue.
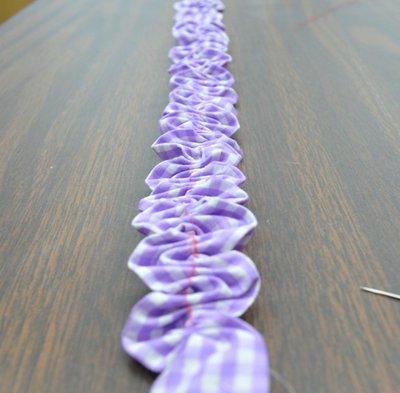
Pull up the threads to gather to the desired length, and as the gathering thread is drawn up the ribbon will form scallops. Tight gathers are about 1/4 the length of the ribbon used.

That was a little tight for my taste, so I lengthened it to 18", 1/2 the length of the ribbon. Smooth out the gathers to make scallops even, then knot the end and clip the thread.

Apply where desired as a trim, stitching by hand or by machine.
~~~
RUCHED FABRIC STRIPS
Next we'll use a 2" x about 40" strip of fabric and ruche it in the same manner as above, then swirl it around in a circle to form a ruched flower.
Prepare your strip by folding the raw outside edges to the center. PRESS to form a 1'' folded strip.

MARK using the corresponding size template. This time, I used a Frixion iron-off pen to mark the zig-zags.

Hand- or machine-stitch on the drawn lines to gather. (Oops, should have pressed out the lines before I pulled up the threads to gather! Marks disappear with heat, so I can iron later.

RUCHED FLOWER
A 1" x 40" width of fabric should gather down to about 14" in length, the perfect size to form a spiral flower. Start in the center, and swirl the ruching in a spiral. Tuck the raw edge under and stitch to secure.

If applying to a quilt or pillow, stitch directly to the fabric through the basting lines. If you are making a stand-alone flower for a pin or headband, stitch or hot-glue to a 3" circle of fabric, felted wool or crinoline. Add a cute button center and a pin-back or clip depending on how you'd like to use the flower.

~~~
PRE-RUCHED RIBBON

Here's another option: PRE-RUCHED ribbon trim, available from Riley Blake Designs. Ask for it at your local quilt shop. The ribbon comes in several colors, and the work is already done for you! Here are a couple of samples of how I've used this adorable gathered gros-grain ribbon:
 Purse handle in this PJ Pillow (see TUTORIAL)
Inner trim on this "Hexagarden" Wall Hanging (see PATTERN)
Now Ruche out and give Ruching a try! You'll love it!

Next time we'll take a look at some simple Gingham Embroidery stitches... more great vintage sewing techniques to come! Meanwhile, Happy Stitching!

see SLIDESHOW

see SLIDESHOW
Comments from RBD
Monday, June 2, 2014
Shall We Gather III ~ Elastic & Shirring!
Welcome to today's Cutting Corners tutorial, sponsored by Riley Blake Designs!

Gathering with E-L-A-S-T-I-C today!

Here's a slick little tutorial to continue my sewing basics series, "Shall We Gather?"
And just in case you missed the previous lessons, see Lesson I for tips on creating beautiful gathers with your sewing machine. Lesson II teaches the fun vintage art of Smocking.
Today, we'll take a brief look at the use of regular old elastic, try a little bit of elastic ribbon, then we'll use elastic thread for another great vintage technique: Shirring!

At the end of today's lesson we'll make a sweet little dress with this technique.
Supplies:
Fabric swatches, 1/4" elastic, RBD elastic lace ribbon, elastic thread.
(See list below to make the shirred summer dress)
Instructions: Gathering with Elastic.
1) Direct Application.
Cut a piece of elastic the size you want. Pin or baste one end of the elastic to the wrong side of fabric at the beginning edge.
S-t-r-e-t-c-h the elastic to the other side of fabric. Relax the elastic a bit, taking up a few little gathers if necessary, then begin stitching.
Cut a piece of elastic the size you want. Pin or baste one end of the elastic to the wrong side of fabric at the beginning edge.
S-t-r-e-t-c-h the elastic to the other side of fabric. Relax the elastic a bit, taking up a few little gathers if necessary, then begin stitching.
Hope for the best as you try to a) keep the elastic straight, b) keep your stitches even and straight, and c) make it to the end without running out of elastic. Good luck with that!
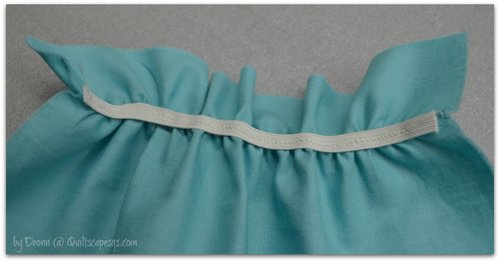

Next, we'll try the same technique with this pretty little Riley Blake elastic lace ribbon. Use a zig-zag stitch through the center of the lace.
Apply elastic lace to the front of the garment to create fun look. Use around a cuff, collar or neckline.
Apply elastic lace to the front of the garment to create fun look. Use around a cuff, collar or neckline.

Most common problem with both these techniques? Running out of elastic before you reach the end. Especially if the fabric where you're applying the elastic is more than 2 X wider than the elastic.
2) Gather with Casing.
Fold over an edge of fabric and stitch a channel to feed the elastic through, or create a casing with another piece of fabric. In this case, I used single-fold bias tape.
Fold over an edge of fabric and stitch a channel to feed the elastic through, or create a casing with another piece of fabric. In this case, I used single-fold bias tape.
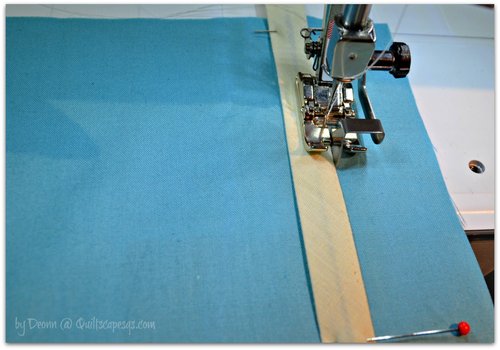
I like using my edge-joining foot then move the needle position to get a close, even, straight stitch.
Thread elastic through casing using a bodkin or safety pin. Tip: Attach a pin to both ends of elastic to prevent pull-throughs!

Pin into place, then baste along edges to secure until enclosed into a seam.

3) Shirring. OK, now we'll use elastic thread for the next technique, definitely the easiest approach for gathering with elastic.

Look for this product near the elastic section in fabric stores. Experiment to find which brand works best in your machine. The elastic thread is wound on the bobbin, with regular thread stitched on the right side of fabric. Use this application for gathers at a waistline, neckline, cuffs, bodice, anywhere!
Wind elastic thread on bobbin. Don't overstretch, but don't wind too loosely, either.
I tried both winding by hand...
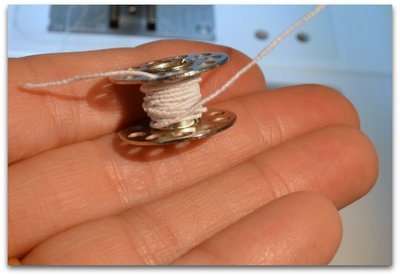
...then with the bobbin-winder directly from the spool without lacing through the tension guide. Worked great on the Bernina, which has a front-load bobbin case.

Bring up elastic thread, just as you would for regular bobbin thread. Be sure to leave a good size tail for starts and stops.

Adjust stitch length for a longer stitch, about 3.5.
Work on a flat piece of fabric for best results. * Determine where you'd like your stitches to start, then begin stitching on the right side of fabric. Elastic thread will be on the back side.
Backstitch a couple of stitches, just as you would do at the edge of any garment seam.
Stitch in straight rows, 1/4" to 1/2" apart. (Easy to do if your print has a pattern or line to follow, such as RBD Cotton Gingham prints!) Mark lines on the fabric, or use the edge of your presser foot to gauge the distance. Try using your seam guide bar attachment on the presser foot for consistent spacing.
Flatten the fabric in front of the needle so it doesn't stitch unnecessary pleats.

When you get to the end of a row, pivot the needle and travel to the next row. Continue until you have the number of rows or width of shirring desired. Example: 2-3" for a waistline or cuff, 1-2" for a neckline, 6-8" or more for a bodice, etc.

Troubleshoot:
?? What if the bobbin runs out in the middle of a row?
?? What if the bobbin runs out in the middle of a row?

Clip the threads, wind a new bobbin, then continue stitching, overlapping the end of the previous stitches about 1/2". You could also tie a knot in the elastic if you wish.
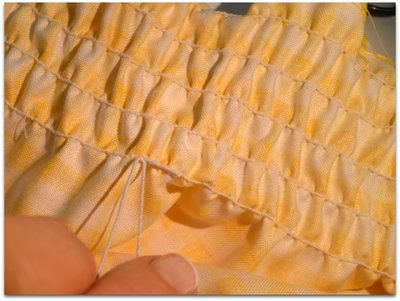
?? What if it doesn't look like it's doing much gathering?
The more rows added, the more the gathers will tuck in. Once the shirred rows are stitched, use an iron with a steam setting to shrink down the elastic. Be careful not to flatten the shirring as you press. If you don't have a steam iron, spray a little mist then lightly press. The elastic will shrink the stitched area to about half of its original measurement.
Now, let's make a Sweet little One-Seam Shirred Gingham Summer Dress!

Supplies:
* Gingham print with squares measuring 1/4"
* Matching Thread
* Elastic Thread
* Elastic Lace or other ribbon for straps
* Matching Thread
* Elastic Thread
* Elastic Lace or other ribbon for straps

Instructions:
Calculate size:
Measure chest of person for whom you are making this sundress, then double that measurement, plus 1" for the back seam. That is the width measurement.
Measure from armpit to length desired. Add 1/2" for top hem plus 2-1/2" for bottom hem. That is the length measurement.
Measure chest of person for whom you are making this sundress, then double that measurement, plus 1" for the back seam. That is the width measurement.
Measure from armpit to length desired. Add 1/2" for top hem plus 2-1/2" for bottom hem. That is the length measurement.
1) Clean-finish side seam edges (short sides) using serger or zig-zag stitch.

2) Finish top hem. PRESS top edge under 1/2". Tuck raw edges inside fold and press again. Edge-stitch by machine to finish.

3) Bottom Hem: PRESS bottom edge under 1/2". You will finish hem after dress is fitted.
4) Shirring: Beginning 3/4" down from the top edge, stitch horizontal rows using elastic thread as described in the steps above, as many as desired. Backstitch at the beginning and ending; clip threads.


4) Shirring: Beginning 3/4" down from the top edge, stitch horizontal rows using elastic thread as described in the steps above, as many as desired. Backstitch at the beginning and ending; clip threads.

5) Fold shirred fabric right sides together. Match print or plaid, and stitch center back seam, using 1/2" seam allowance.

Lightly press the seam open.

6) Using a steam setting on the iron, steam shirred areas to shrink down elastic. Do this around the perimeter of the dress.

8) Turn up the hem; pin in place. Hand- or machine-stitch to finish.

Happy Sewing!


RBD Comments
- oh my ....is that yellow gingham....is that a tube dress..we use to call them...my girls loved these when they were little....you made it look so easy so frilly so girlish...yes love it... and side note...why don't we get these in an email blast like RBD videos...I want to know the minute these come out....yes that would be very nice... I believe many would love to see this..by Mdm Samm
June 03rd, 2014 at 10:40 a.m. - Very useful pictures and words for me. Thank you.by izosik
June 03rd, 2014 at 12:43 p.m. - I saw a dress in Target like this one that I wanted to make. It was made out of knit fabric. Would I use the same technique on knit as this? Yes! You may want to mark your lines or use the guide bar attachment on your presser foot to ensure even lines as you stitch. Deonnby kasey
July 21st, 2014 at 5:18 a.m. - Tried this technique once and could not, for the life of me, get my sewing machine to stitch with the elastic thread wound on the bobbin. Tried winding looser and tighter, but no luck. Your yellow gingham little dress makes me want to try again. Love it!by Annie
August 17th, 2014 at 11:42 a.m.
Subscribe to:
Comments (Atom)


July 08th, 2014 at 5:38 p.m.
July 08th, 2014 at 6:06 p.m.
July 09th, 2014 at 11:28 p.m.
July 10th, 2014 at 8:14 a.m.
Hello, Astrid, Yes, you can cross over to the other side of the ribbon at the points and continue stitching. Deonn
October 29th, 2014 at 1:36 p.m.