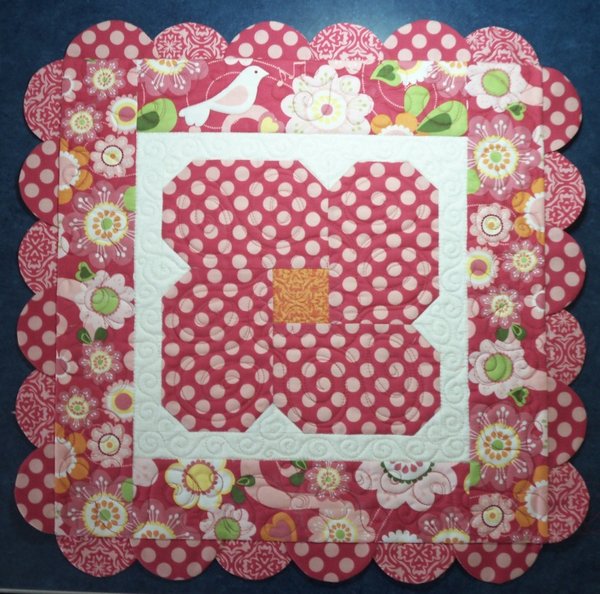
This is my second Tutorial for Riley Blake Designs' "Cutting Corners"! Make this fun, fresh-cut flower table topper featuring stitch-n-flip corners, plus some great tips for making simple scallops with fabrics that will brighten your day!
Materials / Cut List for Bloomin' Blossoms for Spring Table Topper:
- Flower: 1 Fat Quarter ........... (4) 4-1/2" x 6-1/2" rectangles
- Flower Center, accent color .... (1) 2-1/2" square
- Background/Sashing: 1/8 yard .. (3) 1-1/2" x width of fabric strips
Subcut into: (12) 1-1/2" squares
(2) 1-1/2" x 11" strips
(2) 1-1/2" x 13" strips - Border: 1/4 yard .................. (2) 3-1/2" x 13" rectangles
(2) 3-1/2" x 19" rectangles - Backing: 5/8 yard
Instructions:
Use an accurate 1/4" seam allowance to construct the block.
Press seam allowances in the directions indicated.
Press seam allowances in the directions indicated.
Always press on the right (printed) side of fabric for crisper folds
1) CUT and assemble pieces for 1 Flower:
(4) 4-1/2" x 6-1/2" rectangles
(1) 2-1/2" square
(12) 1-1/2" squares
(4) 4-1/2" x 6-1/2" rectangles
(1) 2-1/2" square
(12) 1-1/2" squares

2) DRAW a diagonal line from corner to corner
on each of the 1-1/2" background squares
on each of the 1-1/2" background squares

3) LAY OUT background squares right sides together on each petal
as pictured, keeping squares in the same three corners.
as pictured, keeping squares in the same three corners.

5) TRIM corners 1/4" from stitched line.

6) PRESS each corner in direction indicated. This will help
to alternate seam allowances and fit the petals together.
to alternate seam allowances and fit the petals together.

7) LAY OUT flower as pictured.
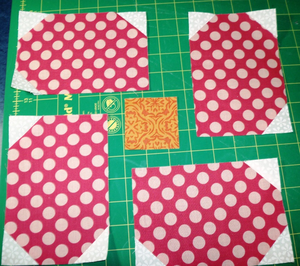
8) PIN flower center to lower corner (without background),
with right sides together.
STITCH a partial seam (about 1-1/2") using 1/4" seam allowance.
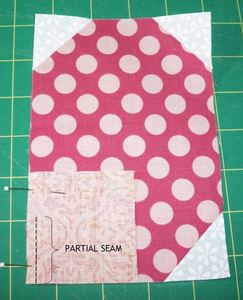
9) PRESS seam allowance toward petal

10) LAY OUT next petal as pictured.
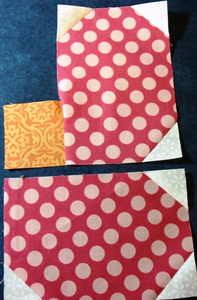
11) PIN units right sides together, alternating seam allowances
at background triangles, then STITCH seam.

12) PRESS seam allowance toward petal.

13) LAY OUT next petal.

14) PIN units right sides together, then STITCH.

15) PRESS toward petal.
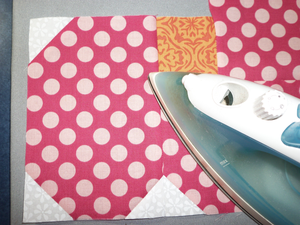
16) LAY OUT last petal, folding first petal out of the way.

17) PIN then STITCH.

18) PRESS toward petal.

19) PIN the remainder of the beginning partial seam.STITCH, overlapping a few stitches to complete seam.

20) PRESS toward petal.

21) SQUARE UP edges. Block should measure 10-1/2", unfinished.

22) TRIM 11" sashing strips to size of block, PIN sashing to opposite
sides of block, then STITCH. PRESS toward flower.
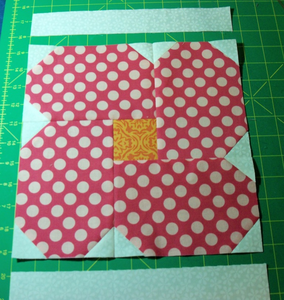
23) MEASURE block including sashing, then TRIM 13" sashing strips
to that size. PIN, then STITCH. PRESS toward flower.

24) REPEAT steps for sashing to add borders: MEASURE block,
TRIM border piece to correct size, PIN, STITCH, PRESS;
MEASURE, TRIM, PIN, STITCH, PRESS.

25) LAYER, QUILT as desired. TRIM quilt.

Finishing:
PREPARE BINDING STRIPS


CUT 4 - 1-3/8" x 20" strips from backing fabric for binding strips
FOLD strips in half, wrong sides together; PRESS.
FOLD strips in half, wrong sides together; PRESS.
PREPARE SCALLOPS
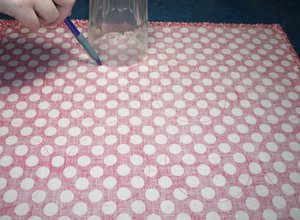


LAY OUT the remainder of the flower fabric and backing fabric, with right sides together.
DRAW (12) 3-1/2" circles, leaving at least 1/2" between circles. PIN together.
DRAW (12) 3-1/2" circles, leaving at least 1/2" between circles. PIN together.
STITCH circles on drawn lines; overlap beginning stitches about 1/2".
TRIM using pinking shears to clip curves.
CUT each circle in half to yield 24 scallops.
TURN each half-circle right side out and PRESS.


LAY OUT and overlap scallops right sides down on quilt,
6 per side. You may want to alternate prints.
Leave 1/4" space from corners to allow for seam allowance.
GLUE-BASTE (Jillily Studios' Appli-Glue is my favorite)
or PIN, then BASTE-STITCH to secure scallops to the quilt.
TRIM using pinking shears to clip curves.
CUT each circle in half to yield 24 scallops.
TURN each half-circle right side out and PRESS.


LAY OUT and overlap scallops right sides down on quilt,
6 per side. You may want to alternate prints.
Leave 1/4" space from corners to allow for seam allowance.
GLUE-BASTE (Jillily Studios' Appli-Glue is my favorite)
or PIN, then BASTE-STITCH to secure scallops to the quilt.

APPLY BINDING STRIPS
ALIGN raw edges of a finishing strip with raw edges along one side of the quilt.
STITCH through all layers using 1/4" seam allowance. TRIM ends even with the quilt.
ALIGN raw edges of a finishing strip with raw edges along one side of the quilt.
STITCH through all layers using 1/4" seam allowance. TRIM ends even with the quilt.
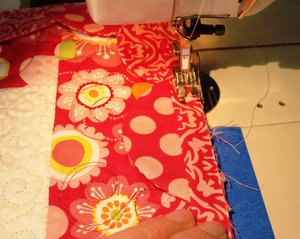
PRESS binding strip away from scallops. REPEAT for opposite side.

FOLD the quilt along the seamline, then fold the finishing strips
to the back of the quilt, covering all raw edges.
This makes the scallops stand up at the edges.
HAND-STITCH the finishing strips to the back of the quilt.

Next, REPEAT steps and apply binding strips to top and bottom of quilt,
leaving 1/4" extra on each end to fold around raw edges.
FOLD strips to the back and HAND-STITCH to the quilt as before,
tucking the strips in at the edges to finish the corners. A whip-stitch is helpful.
You may need to grade (trim a few layers) the seam allowances at corners.
Scallops will point outward.
ENJOY your new Bloomin' Blossoms Table Topper!
 |
| Bloomim' Blossoms for Spring Table Topper, 20" x 20" by Deonn Stott |
Hope you enjoy this fun project! Questions? Comments? You are always welcome at Quiltscapes!
Happy Quilting!


No comments:
Post a Comment
So happy you stopped by for a visit! Thank you!