Easy Exposed Zipper Installation!

Riley Blake Designs ' Chevron Laminate Cotton


Project: ZIPPERED POUCH
Supply List:
* 7" polyester zipper (or two)
* 2 @ 5-1/2" x 8-1/2" rectangles of fabric (I used laminate, but any fabric will work!)
* Fabric for pocket lining (optional)
* Zipper Foot for your sewing machine
* Glue Stick (optional)
* 48" Shoelace
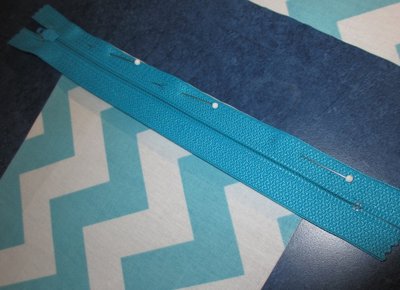
1) With right sides together (zipper face down; fabric right side up), center and align the edge of the zipper tape with the 5-1/2" edge of the fabric as pictured; Pin.

The zipper should extend beyond the length of the fabric, making it easier to get the zipper where you want it without having to deal with the zipper hardware.
Stitch the zipper in place with a basting stitch. I sometimes use a glue stick to apply the zipper, or zig-zag stitch if I also need to finish the fabric edges to keep from fraying.

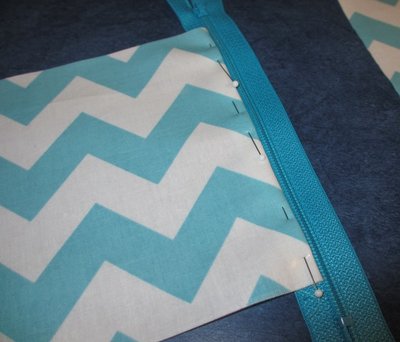
Once that step is complete, flip the fabric back and fold right along the edge of the zipper teeth; pin
into place.

Using your zipper foot, edge-stitch about 1/8" from the teeth.

Repeat the same steps on the opposite side. Unzip to top-stitch if necessary.

See how easy that was, with the zipper pull and stops out of the way?
Secure the ends of the zipper by stitching carefully with a couple of zig-zag stitches for new top and bottom stops, making sure the zipper pull is below the top stop, then trim off zipper ends.

The bag is ready to finish, but I wanted to add a side pocket, so here's how to install a zipper without stitching into a seam. I use this method mostly for pockets.
Mark a line where you'd like your zipper, then stitch a rectangle slightly larger than the width of zipper teeth, about 3/8" x length desired.

Clip center line and clip "Y" to corners as pictured.

Press under to form opening along stitched edges.
Use a glue stick to keep in place if necessary.
Center zipper, pin, and TOP-STITCH along the edges through all the layers.

You may need to stop and scoot the zipper pull out of your way as you stitch. Back-stitch carefully over zipper coils at each end.
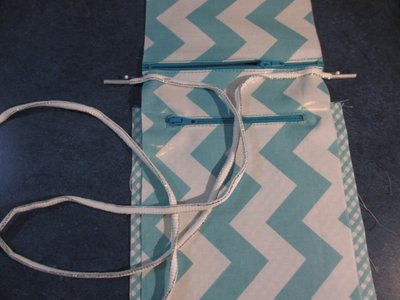
To create the pocket, stitch another layer of fabric to the top edge of zipper tape, with the right side facing the back side of the pocket zipper. I zig-zagged the fabric in place. Since this pouch is so small, the edges can be stitched into the side seams to finish the pouch construction.

Pin shoelace ends into place.

Push the shoelace out through the top zipper opening and trim edges even.
Pin right sides together. Be sure to leave your top zipper open for turning!

Stitch three sides, back-stitching at the shoelace straps, and stitching carefully over the zipper coils. Zig-Zag or serge raw edges to finish. Turn pouch right side out and use a dull chop stick to push out the corners. Trim shoelace ends and add a nice zipper pull or ribbon to finish.

Ready to stow your checkbook, coin purse, cell phone, sunglasses, etc.;
sling over one shoulder and go.

Here's a sample of a decorative zipper with exposed teeth on my "Snippets" bag. Larger plastic teeth/coils would make it difficult to trim off, so it's necessary to use the exact size zipper. Adds just the right touch, don't you think?


I also like the look of a zipper with the tape exposed too. Yeah, that's me, Halloween, 1999. Feelin' groovy in an old polyester dress made in the early 1970s. And yeah, it was a metal separating zipper that ran the whole length of the dress. So Stylish!

The other day at a little fashion show I saw the entire zipper top-stitched on the outside of the back of a skirt, dress and shirt as a design feature!! Let's just say it works if the fit is right and the zipper is not too heavy for the fabric it's applied to. Zippers are making a reappearance as a fashion detail!
I think that about covers "Exposed Zipper" installation. You can find Basic zipper instructions for centered application included in the zipper packaging.

Nancy Zieman (Sewing With Nancy) also has a couple of great tips for this, including a pinless technique to save time and effort. Here's that link: CENTERED ZIPPER.
This is the first in a series of Zipper tutorials. Next time we'll look at Lap or Fly Zippers, then we'll tackle Invisible Zippers (my sister's favorite)! Meanwhile, you can find more tips and other Snippets from my sewing room here at Quiltscapes!
Happy Sewing!


March 04th, 2013 at 4:39 p.m.
March 04th, 2013 at 5:37 p.m.
August 10th, 2013 at 9:27 a.m.