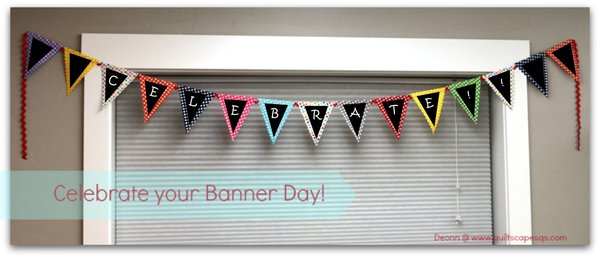
Happy November! It is the beginning of the season of giving thanks around here—of gatherings and celebrations.
So, let’s... C E L E B R A T E ! ! !

Here’s a fun way to use a fancy rotary blade to make a fancy, quick, NO-SEW project for all your “BANNER DAY” occasions. After all, ‘Tis the season!
SUPPLIES:

* Up to 15 ~ 8-1/2" squares or scraps (I used a 10" stacker of RBD dots)
* 2 yards double-sided fusible web
(Got a few samples in the swag bag at Fabric Fest! Perfect!)
* Scallop, waffle, or wavy rotary blade, mat and ruler
with a 45-degree marked angle for rotary cutting.
This is a decorative blade with a Victorian edge by Fiskars. Great for crafting!
This is a decorative blade with a Victorian edge by Fiskars. Great for crafting!

* Iron and ironing board, Mylar pressing sheet
or parchment sheet liner (to prevent fusible from sticking
to the iron or ironing board).
* 2 to 3 yards of cute ribbon, ric-rac or cording
* OPTIONAL: 1/4 yard of chalkboard fabric
chalk or chalk pen
chalk or chalk pen
INSTRUCTIONS:
Follow the manufacturer’s instructions to FUSE the web to the wrong sides of your 8-1/2” squares. Use a Mylar pressing sheet or parchment baking sheet to protect the surface of your iron and ironing board.

Cut squares apart and remove the paper backing.

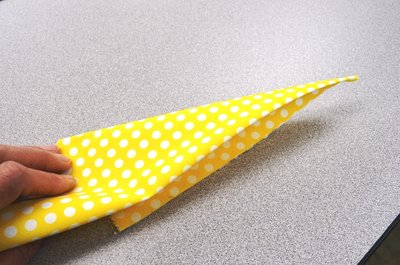
FOLD each square diagonally in half, fusible web sides together, forming a triangle.

FOLD again, matching the long sides and FINGER-PRESS to find a center mark.

Unfold to the original triangle, and lay the fabric on a cutting mat, aligning the point and the center fold line along a straight line on your cutting mat. Cut the triangle so it measures about 7 inches tall and 6" wide.

Change your straight rotary blade with the fancy scalloped/wavy blade. As always, use caution when changing your rotary blade.

Place your ruler on the triangle, about 1/4" from the edge, and TRIM using the fancy blade. Repeat for all three sides.


The finished isosceles triangle will be approx 6-1/2" tall by 5" wide. The blade worked really well because the fabric was stabilized with the fusible web. Now, the fusible web will want to stick to itsself, but you will need to SEPARATE the top inch where your string will go. Use a fingernail or pin to help.

Cut and trim 11 to 15 large triangles in assorted colors. Use the scraps to make mini triangles for more cute little banners. Arrange your triangles in a pleasing order, then slide in the ribbon, rickrack or cording at the top between layers, down about 1/2” from the top. Leave a tail on each end of your banner.


PRESS to adhere the triangles together. Since the front and back were cut at the same time, the edges should align perfectly. Follow the manufacturer's instructions and press to activate the fusible web glue, encasing the cord. About 8 seconds of heat will do. Over-heating can dissolve the fusible and make it not stick. If this happens, slip more fusible in, or you can edge-stitch on the machine with a 90-100 size needle.

For the large banner, repeat the same process. These pictures were cuter. Ü Your banner is complete and ready to hang up and add a cheery accent to any space.
~~~
To add a re-writable surface to the banner, CUT a 5” strip of the chalkboard fabric. CUT into isosceles triangles, about 5" tall and 4" wide. You can use either a straight edge or the scallop blade again.
STITCH chalkboard triangles to the banner triangles, leaving about a 1/2" space of fabric around the edges.
If you'll be using regular chalk, CURE the chalkboard fabric. Take the edge of the chalk and smear it over the chalkboard fabric. Wipe off with a damp cloth. If you are using a liquid chalk pen, you can skip this step.
Now you're ready to write in your favorite celebratory quote with the chalk:
M E R R Y C H R I S T M A S
or
H A P P Y B I R T H D A Y !
These are probably the longest phrases, and will require 15 triangles (one for the space between words).
Write in the holiday, fill in any blank spaces with a cute drawing of some kind.
T H A N K S G I V I N G
H A P P Y H E A R T D A Y
A family name would be great for reunions or other get-togethers:
S T O T T F A M I L Y
Great for any occasion:
C E L E B R A T E !
How about writing a positive note for every day:
G R A T I T U D E or B L E S S I N G S
G I V E T H A N K S
or
L O V E L O V E L O V E
You may just want to keep it simple:
F A M I L Y
Or how about the very simple, all-occasion:
H A P P Y !
Or, just leave them plain. Such cuteness!


No comments:
Post a Comment
So happy you stopped by for a visit! Thank you!