Sampler featuring Riley Blake Designs "Sweet Nothings" by Zoe Pearn
COURSE DESCRIPTION:
PRINTABLE INSTRUCTIONSDesign
Layout * Setting * SashingFor today's "Quilting Basics" lesson we're going to grow a fabulous quilt!Using the nine blocks from our "Building Blocks" series,
we'll see what it takes to make a quilt just the size you'd like! COURSE INSTRUCTOR:
Deonn at Quiltscapes
PRINTABLE INSTRUCTIONSDesign
Layout * Setting * SashingFor today's "Quilting Basics" lesson we're going to grow a fabulous quilt!Using the nine blocks from our "Building Blocks" series,
we'll see what it takes to make a quilt just the size you'd like!
 COURSE INSTRUCTOR:
 Deonn at Quiltscapes

COURSE SUPPLIES:*Design Wall, batting or flannel-backed plastic tablecloth
*Nine 9-1/2" (unfinished size) Building Blocks quilt blocks
(see previous step-by-step tutorials↓ here)
I - Squares, II - Triangles, III - Flying Geese
(actually any 9-1/2" blocks will do!)*Inner Border print: 3/8 yard
*Outer Border print: 3/4 yard
*Binding: 1/4 yard
*Backing: 1-1/8 yard
(But is that all?? We'll soon see...)
Note:If you are just joining us, you can
get started here ↓ to assemble a basic sewing kit:
Tips, Tricks & Tools
COURSE INSTRUCTIONS:
Step 1) - Design Wall - the Fun Begins!If you are lucky enough to have a design wall, you're all set! If not, here is a snappy idea to get going: Buy an inexpensive flannel-backed plastic tablecloth (plain, no print) and pin it to a wall with the flannel side facing out.
A standard size is about 52 x 70".
This is a great portable design wall - so lightweight - just roll it up and put it away, then unroll and continue designing or sewing. Or you could use batting, flannel, fleece, etc. or just lay out your blocks on the living room floor. ☺
Now, relax, take your time and enjoy the process!
Step 2) - Lay Out / DesignLay out your nine quilt blocks, 3 x 3 in an arrangement that pleases you.
 27" x 27"
Friendship Star, Double Four-Patch, Shoo-Fly
Nine-Patch, Dutchman's Puzzle, Nine-Patch,
Ohio Star, Rail Fence, Sawtooth Star
A standard size is about 52 x 70".
This is a great portable design wall - so lightweight - just roll it up and put it away, then unroll and continue designing or sewing. Or you could use batting, flannel, fleece, etc. or just lay out your blocks on the living room floor. ☺
Now, relax, take your time and enjoy the process!
Step 2) - Lay Out / DesignLay out your nine quilt blocks, 3 x 3 in an arrangement that pleases you.
 27" x 27"
Friendship Star, Double Four-Patch, Shoo-Fly
Nine-Patch, Dutchman's Puzzle, Nine-Patch,
Ohio Star, Rail Fence, Sawtooth Star
Add a border:

33" x 33"You'll notice that the quilt looks a bit jumbled.
The balance is OK, but the border print is so busy
there is no place for your eyes to rest!
How about adding a little stop border?
The balance is OK, but the border print is so busy
there is no place for your eyes to rest!
How about adding a little stop border?

36" x 36"
Now that seems to help define the quilt and allows your eyes to rest,
but it still needs more definition:
but it still needs more definition:

38" x 38" Wall Hanging or Table Topper
Ahh, much better!
Step 3) Quilt, Bind & Enjoy!Now we can quilt it, bind it and hang it on the wall or use for a table topper.
But what if you want it a little bigger, say for a baby quilt?
How about just adding another fun print for a border,
and making the outer border larger?
40" to 45" square is about the right size for a baby.
But what if you want it a little bigger, say for a baby quilt?
How about just adding another fun print for a border,
and making the outer border larger?
40" to 45" square is about the right size for a baby.
 42" x 42" Baby Quilt
This quilt would require an additional:
3/8 yard for the middle border (stripe)1-1/4 for the backing
3/8 yard for the middle border (stripe)1-1/4 for the backing
PRINTABLE INSTRUCTIONS ← Wall Hanging
Now, what if we don't want to go to all that work of sashing, borders and more borders? Let's put it en pointe (on point)! Tilt each block 45o -- This will widen the quilt block size from corner to corner, and you will need to add filler blocks, or setting squares and triangles. Then you can decide
if you want to add a border, sashing, more borders, wider borders, etc.
if you want to add a border, sashing, more borders, wider borders, etc.
Here we go:

38" x 38" with setting squares and triangles

45" x 45" - with border

47" x 47" with stop border and outer border

54 x 54" - Sashing and larger borders
 60 x 60" Lap Quilt with Setting blocks, Sashing and two Borders
This Lap-size quilt will require:
Setting squares and triangles: 1-1/8 yards
Sashing: 7/8 yard
Middle Border: 3/4 yard stripe
Outer Border: 1-5/8 yard
Binding: 1/2 yard
Backing: 3-1/2 yards cotton,
or 1-3/4 yards plush fur (Minky - 60"wide)
OK, it's not over yet! What if we'd like an even larger quilt? Well, this time, it may require making a few more blocks, maybe even some alternate blocks. Let's see what happens when we add 4 more Nine-Patch blocks, and use some large quarter-square triangle blocks as our setting blocks?
Watch this one evolve!
Watch this one evolve!

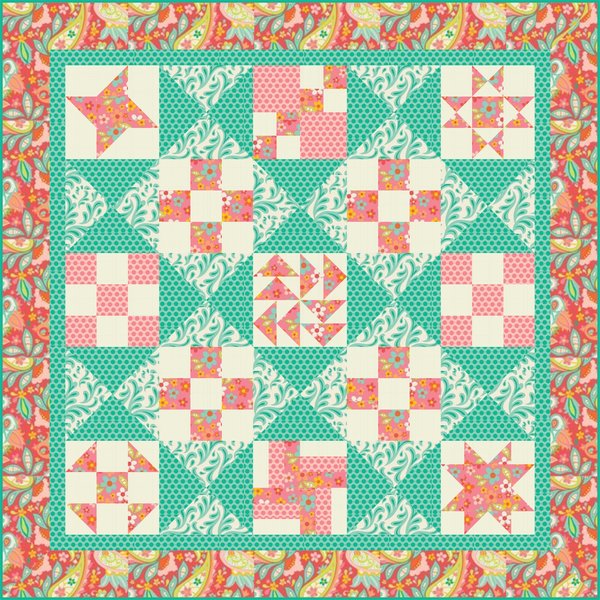
45" x 45" with hourglass setting blocks
(Don't you love the secondary pattern of large green stars
when quarter-square triangles are added as setting blocks?)

54" x 54" with border

57" x 57" with a stop border

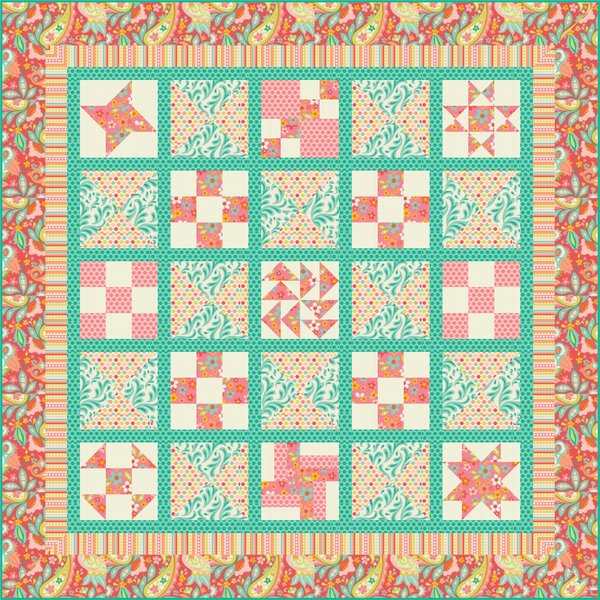
63" x 63" with additional stripe border

70" x 70" with sashing

70" x 91" - And there's the bed size! (Double the number of Sampler Blocks)
Please send me an email if you'd like the math formula for the setting squares and triangles to put blocks en pointe, or to make the quarter-square triangles, or if you'd like a fabric /cut list for the larger quilt projects. Now I just need to make this quilt. Hmmm, how should I put it together? So far, I have 135 different options... Don't you love the creative process of quilting??


No comments:
Post a Comment
So happy you stopped by for a visit! Thank you!