
Sometimes you want to get a little fancy around the edges! These fancy scallops and prairie points work well both as outer or inner embellishments on quilts and pillows. Practice both techniques on these adorable, quick pillow projects, just in time for Valentine's Day!
Heart Pillow with Scalloped Edges

Supplies: 2 Coordinating Fat Quarters (18" x 21")
1 to 2 packages Itty Bitty 3.5" stackers
Polyester Fiberfil
Matching thread, needle
I ♥ Applique' pattern << click to download
1 to 2 packages Itty Bitty 3.5" stackers
Polyester Fiberfil
Matching thread, needle
I ♥ Applique' pattern << click to download

Prepare Scallops: Start with 20 @ 3-1/2" squares.
Trace a 3" circle on the wrong side of 10 squares
using a removable marking instrument.
(I like my Frixion iron-off pen and traced the 3" base of a spool of thread)

Layer two squares, right sides together.
Stitch on the line, overlapping beginning/ending stitches.

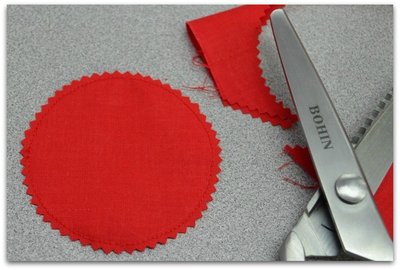
Trim circle, about 1/4" from stitches.
(I like pinking shears for the perfect notched edge = smoother curves.)
Cut in half.
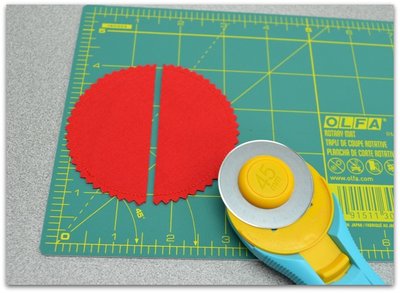
Turn scallops right sides out; press.

Lay out scallops over pillow top with raw edges aligned.
Baste (glue, pin, stitch) scallops to pillow.
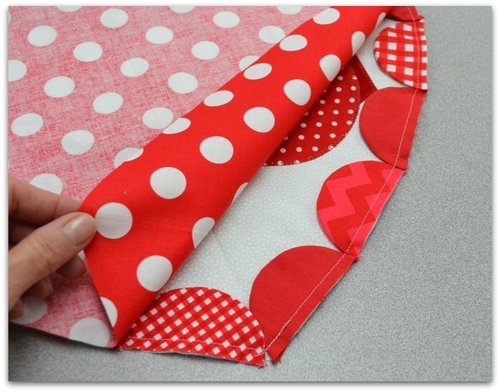
Layer pillow back over front, right sides together
and stitch using a generous 1/4" seam allowance.
Leave a 4" space for turning.
CLIP inner corner of heart to but not through the thread,
then turn pillow right side out.
then turn pillow right side out.
Fill pillow with fiberfil, then stitch opening closed.
~~~
I ♥ Applique' Pillow with Prairie Points

Supplies: 3 Fat Quarters
6 @ 5" stackers or charm squares
1/8 yard binding
18" zipper
6 @ 1" Buttons
3 @ 1/2" buttons
I ♥ Applique' pattern (with feathers)
Cut 1 front piece @ 15" wide by 14" in length for pillow top. Prepare applique' piece (I used lightweight fusible web and a blanket stitch) then center and stitch to pillow front. (Refer to the I ♥ Applique' Lessons referenced at the bottom of this post for a refresher) At this point, you could layer the pillow top with batting/backing and quilt if desired.6 @ 5" stackers or charm squares
1/8 yard binding
18" zipper
6 @ 1" Buttons
3 @ 1/2" buttons
I ♥ Applique' pattern (with feathers)
Prepare Prairie Points: (say that fast 3 times!!) Use either technique #1) or #2) and press the six 5" squares.
#1) Fold diagonally in half twice; align raw edges and press.
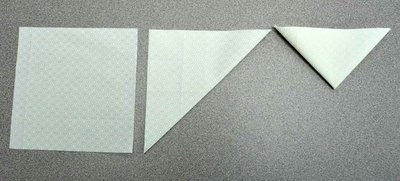
or #2) Fold square in half, then fold corners to the center,
aligning raw edges. Press well.

Lay out individual prairie points as desired; baste (glue/pin/stitch,etc).

Rifle through Great-Grandma's old buttons = 6 medium size, 3 small.
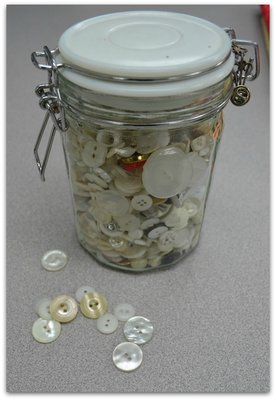
Stitch on buttons or embellishments.

If you are not using a zipper, cut two backing pieces at 15" x 10", then finish one long edge on each piece by folding edge over 1", then fold again and top-stitch. Overlap the edges to the size of the pillow and proceed by layering the pillow top wrong sides together. Baste edges.

Add Binding: Cut 2 @ 2-1/4" x width of fabric strips for binding, then follow the instructions to finish the binding HERE, or try a machine binding technique by following this video:
Or, you could even add a little Faux-Piped binding from last month's tutorial HERE! Here's the back side... I like it as much as the front.
 RBD Sparkle Red Quatrefoil
P.S. Here are links to supplemental Cutting Corners tutorials:
I ♥ Applique' Lessons ~
#1 Raw-Edge #2 Chenille #3 Turned-Edge #4 Needle-Turn
Fat Quarter Pillows
Zip It! #2 Lapped Zipper
Binding Basics Lesson
Faux-Piped Binding Lesson
Machine-Binding Video
I ♥ Applique' Lessons ~
#1 Raw-Edge #2 Chenille #3 Turned-Edge #4 Needle-Turn
Fat Quarter Pillows
Zip It! #2 Lapped Zipper
Binding Basics Lesson
Faux-Piped Binding Lesson
Machine-Binding Video


I love the scrappy scallop method! Thanks for sharing!!!
ReplyDeleteThese pillows are both so adorable. Love that heart applique design. So clever of you with the scallops and prairie points at the edges!
ReplyDeleteBeautiful. Thank you so much for the great tutorial.
ReplyDeletegreat ideas
ReplyDeleteGreat tutorials. Thanks for sharing.
ReplyDeleteThank you sew very much for sharing your beautiful and cleverly edged pillows and tutorials. Now we can change out for any season or holiday just by using other fabrics. Happy Hearts...<3 XO
ReplyDeleteVery lovely details to add to any project! Thanks again for linking up!
ReplyDelete