 |
| Kaleido-Medallion with "Practically Perfect" Paper-Pieced Pretty Points! |

Welcome! Let's have some adventures with quilting! (& sewing!)
Showing posts with label Paper-Piecing. Show all posts
Showing posts with label Paper-Piecing. Show all posts
Thursday, August 3, 2023
Practically Perfect Paper-Piecing! A Tutorial + Tips
Monday, March 19, 2018
Sew Tiny!
Thanks to all who visited Quiltscapes on the Small, smaller, smallest blog hop, hosted by Carol @ JustLetMeQuilt! I so enjoyed hopping from blog to blog, such creativity and inspiration! You can find the entire collection HERE.
Congratulations to Martina @ Sunshine Quilting who was drawn as my winner of a Sew Tiny lanyard pattern + swivel hook, with an "Add-an-Eighth" ruler. Your package is on the way to Switzerland!

Also, I'm including a teensy little Swiss flag block to get you started!


Congratulations to Martina @ Sunshine Quilting who was drawn as my winner of a Sew Tiny lanyard pattern + swivel hook, with an "Add-an-Eighth" ruler. Your package is on the way to Switzerland!

Also, I'm including a teensy little Swiss flag block to get you started!

Happy Quilting!
Tuesday, March 6, 2018
"Small, smaller, smallest"... A Blog Hop
 |
| Sew Tiny Lanyard Pattern |
Hi, and welcome to Quiltscapes! The quilts I make are becoming smaller. Is it just me, or has this happened to you, too? When I first dabbled in quilting, I made quilts for everyone in my family. King size, queen size, no matter that they dragged on the floor around the kids' beds. Once those were made and everyone's beds were all covered, I thought, what now? I was hooked and wanted to make more!
Thursday, February 12, 2015
Sewing With Nancy...
So my cute friend Nancy wanted to learn how to paper-piece and came by to spend the day with me in the sewing room. Yes, I was "Sewing with Nancy"!! *Ü*

Her adorable wonky house pattern gave instructions for "Template piecing", aargh!!
Friday, May 31, 2013
That's Amore!


I just love it when HMQS comes around each year. I love to participate in their annual Design Challenge. And now, for the 7th consecutive year, "The Midnight Quilters" have managed to produce another prize-winning quilt! My friend Debbie and her daughters Kami and Amy used free online patterns for the paper-pieced blocks, and Debbie embroidered "Amore" (with a broken arm, too!) I helped with layout, spools and borders. Then I used every type of ♥ quilting motif I could think of in the quilting.


Fabrics were provided by Riley Blake Designs, featuring Flutter by The Quilted Fish
Amore', we adore'! Our little quilt placed 2nd in the contest. All the challenge Quilts were auctioned at the end of the show to benefit this year's charity, Bridge of Love. Our little quilt contributed $575. All in all, the quilts in the challenge raised $5,700. LOVE.

 |
| Button embellishments in the jar, pins and scissors were added later. |


*Sewing Machine and Button Jar from Cherise Creates: PATTERN
*Pincushion/Spools from Quilter's Cache: PATTERN
*Iron from Where the Orchids Grow: PATTERN
*Scissors (and you can see other sewing notions) Quiet Play: PATTERN or PATTERN
*Seam Ripper, Pincushion from Quiet Play: PATTERN
*Free Heart block here at Quiltscapes: PATTERN
HMQS week was just terrific! Incredible quilts (over 700 of them), 200+ vendors, fantastic teachers from around the globe, special displays including one wall-to-wall corridor of modern quilts, design challenges, trunk shows, and so much more! It's my 4th year serving on the HMQS board over the quilted garment division. Since they know I like to sing... well, let's just say it was also my duty to open the show each morning with my version of "That's Amore". Good times.
And for your entertainment -
When it's Spring in the air, HMQS is here, That's Amore!
Grab a friend, grab your bag, so much fun to be had, That's Amore!
And the vendors out on the floor, just can't wait till you come through the doore'.
Why not try out a new machine? Gizmos, gadgets, the latest thing and sooo much more'.
And the quilts on display will take your breath away, you'll adore'!
And our teachers here will teach you everything you'd like to know.
Take a class, build your stash, (pay with cash so your husband won't know).
Scusi mi, gotta go to the Home Machine Quilting Show!

Monday, December 31, 2012
Snippets ~ A Quilter's Name-tag
Getting ready for the New Year... cleaning up the sewing room, and here's a solution for "orphan" blocks.
Sew your favorite quilt block in any size up to 5".

This one is 4-1/2" unfinished, a cute little leftover "orphan" block from my Paper-Piecing Basics Tutorial. << (Download FREE Hot Air Balloon pattern HERE).

Embroider or write your name with a Pigma Pen on the block or on the strip.

Next, decide how you want to finish the edges. For an Envelope Finish (<< instructions), layer right sides together and stitch, leaving an opening for turning, then hand-stitch the opening closed.
Or add a binding, just as with any quilt. I used my favorite method here >> Binding Tutorial, with a narrow 1-3/4" folded binding strip. Layer the top over batting, right side up, then zig-zag to baste the edges together. I added extra batting, to give a little "loft" to my hot air balloon.


Sew your favorite quilt block in any size up to 5".

Leave a space for your name or stitch a 1-1/2" strip of fabric along one side of the block.

Embroider or write your name with a Pigma Pen on the block or on the strip.
Cut a piece of batting and backing to the size needed. I used a piece of Pellon Fusible Fleece and pressed it (with steam) to adhere it to the wrong side of the backing.


Or add a binding, just as with any quilt. I used my favorite method here >> Binding Tutorial, with a narrow 1-3/4" folded binding strip. Layer the top over batting, right side up, then zig-zag to baste the edges together. I added extra batting, to give a little "loft" to my hot air balloon.


Quilt by hand or by machine. I outline-stitched then added some detail around the basket. Then I machine-stitched my binding to the front of the nametag, and hand-stitched it to the back to finish.

Whip-stitch a safety pin or o-ring to the back of the nametag, then pin it on or hang on a lanyard and it's ready to wear to the next guild meeting or quilting event.

Oh, you can almost see it in this ↑ picture with my friend, Becky (Ucreate)!
Monday, October 8, 2012
Paper-Piecing Basics
F O O T S T E P S to successful Foundation Paper-Piecing
 Paper-Pieced Hot Air Balloon pattern by Deonn
Paper-Piecing is one of my favorite techniques to get accurate, detailed shapes in quilt blocks just by stitching on the lines of a pre-printed pattern. This tutorial will show you how with an easy, step-by-step outline for this creative “piece-by-number” method of patchwork.
Supplies:

- Cute fabric scraps
- Paper scissors
- Glue Stick
- Rotary Cutter and Mat
- Add-a-Quarter ruler (optional, but very helpful!!)
- Iron
Instructions
PRINTER-FRIENDLY INSTRUCTIONS
Getting Started
**Find a pattern you'd like to try. There are plenty of free patterns available on the internet in myriads of designs. You may even want to draft your own pattern. Start with a something simple. >>HOT AIR BALLOON<< Pattern
**Use inexpensive paper, something that will tear easily. I use thin, cheap copy paper.

**Print enough for your patterns plus an additional copy to keep as a MASTER. Print from the master for consistency.
**Plan your color layout, and if necessary, shade with colored pencils or marker, or just write description/color.
**Reduce stitch length on your sewing machine to 18 –20 stitches per inch (about 1.5). This will perforate the paper and make it easier to remove when the time comes.
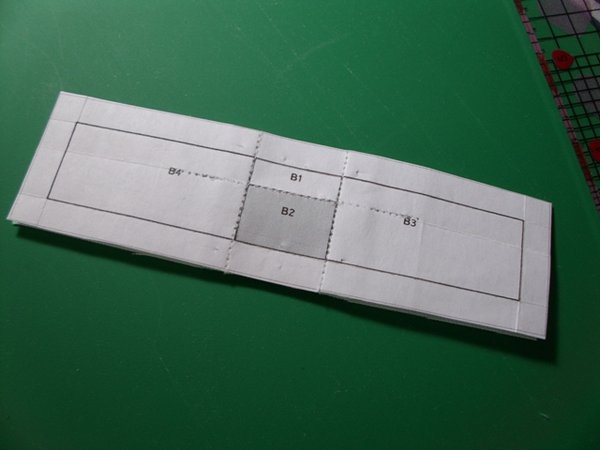
**If pattern has more than one section they will be listed as A, B, C, etc. Loosely cut sections apart, a bit beyond the seam allowance line. Do not trim on the line until block is complete.

**FOLD each solid line on the pattern. These are your stitching lines. Fold all the way to the edges.
**Place fabric for segment #1 right side up on the BLANK side of the pattern, making sure to allow a generous (up to 1/2") seam allowance on all sides of the first segment. Hold it up to a light source to check.


**Pin, use double-sided tape or lightly glue-baste fabric to the pattern.
Now you're ready for these FooTStePS!
 With printed side of pattern up, FOLD pattern on the line between the section you are working on and the next section in sequence.
 TRIM your fabric to 1/4” from the fold line. A helpful tool is the Add-A-Quarter ruler, or Add-an-Eighth if you are making tiny blocks, or you can eyeball it.
Keeping the pattern folded back, ALIGN your next piece of fabric along the trimmed edge, right sides together.


 Fold pattern back into place just before sliding under the needle, pinning if necessary, then STITCH on the printed line, beginning several stitches before the line and ending several stitches after the line.

 Flip Pattern over, unfold the top segment and PRESS with a hot, dry iron, and you're ready to begin the steps to add the next piece!
REPEAT these little FooTStePS, following the numbered sections in order of sequence.
FOLD,

TRIM,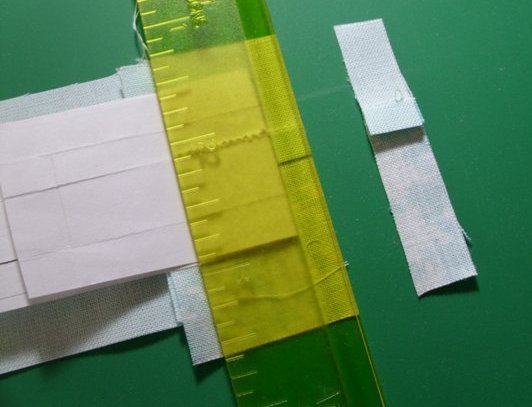
...add the next piece, pin if desired...

STITCH,

PRESS.
Continue to REPEAT these little FooTStePS until the unit is complete.
Continue to REPEAT these little FooTStePS until the unit is complete.
FOLD,

TRIM,

STITCH,

PRESS.
TRIM along the outer dotted line, which is your seam allowance.

See this photo tutorial to make the Hot Air Balloon

Now... Let's put them together!
With paper still on, anchor both units with a pin through the seam allowances.

Pin alongside anchor pins to secure, then remove anchor pins.

STITCH units together on the line.

Remove paper.

...have a paper-piecing perforating party...
PRESS...

Add a little stitchery...

Ready to add to a quilt or project!! Last step: SMILE!!

SUCCESS!! YOU DID IT!!
If you haven't tried this method before now, I hope this opens up a world of new adventures in quilting!! Click HERE for more ideas and helpful hints for resizing, or if your block is not symmetrical, or if you want to paper-piece without actually stitching through the paper... until then, Happy Quilting!


Subscribe to:
Posts (Atom)