Search This Blog

Showing posts with label Quilt Rescue. Show all posts

Friday, January 24, 2014

Can this quilt be saved? A Quilt Rescue story.

A gentleman brought me a quilt made by his Grandma in the early 1970's. 

Grandma had gathered scraps from everyone in the family to make the blocks, and there was a real variety of fabric types besides cotton:  double knit polyester, linen, something silky, decor-weight fabrics, Grandma's apron, daughter's little dress, etc..  The sashing and binding was likely broadcloth, probably with a bit of polyester in it - no shrinkage, hardly any wear.  Held up like a charm.  There were several blocks, however, that had been used and loved to death.  And the polyester batting was lumpy and crusty.  

But he loved the quilt and wanted it re-done.

We discussed the options, such as taking the entire thing apart, using all the good blocks and making another, smaller quilt.  Another option was to scan the damaged fabric and print it out on pre-treated fabric, which I did for another of his quilts, just to repair a square or two.  I actually tried to talk him out of repairing this one and just remembering it fondly.  Instead he chose another option:  make new blocks similar in pattern and style to replace the shredded blocks.   

I referred him to a local quilt shop, and he and his wife brought back a pile of fat quarters.

Step 1)  Deconstruct the quilt.  Remove the ties, remove the binding (throw away the batting), remove the bad blocks.  Thank goodness the quilt has been tied, rather than hand-quilted, though if necessary, that could have been un-stitched...


Step 2)  Make new nine-patch blocks.  

Step 3)  Replace the blocks.  This can be a little tricky, but because no seams had to match, the nine-patch pattern gives a bit of "fudge factor" if the edges need to be trimmed to fit.

Step 4) Re-tie the quilt. Grandma had tied it originally, with a sheet for the backing, and he wanted it the very same.  The original quilt had polyester batting, so that's what was used.  My girls helped put the quilt on my Momma's quilt frames, and we had an old fashioned quilting bee, sitting around the quilt frames, tying the quilt with new ties. *Ü* Here it is after tying.  More like "tufting" with the fluffy batt.


Step 5)  Apply the binding.   Re-press the original binding strips, remove threads, re-trim to even widths, re-join strips, then re-apply.  I double-folded it this time, for better wear.

Step 6)  Delivery!   


Oh, he was thrilled!  Sometimes, a quilt is oh so much more than just a quilt.  It's a warm hug from Grandma. And now this one is good for another 40 to 50 years!

I think Grandma would approve.

Thursday, July 11, 2013

Quilting It Out or "Can This Quilt Be Saved?"

Sometimes a quilter will bring me a quilt and ask me to "just quilt it out..."

Quilt width =

 Border width =

Solution:  (I call it "Quilt Wrangling")
Pin border edge to correct quilt width measurement.

 Quilt body lies flat, borders are waving hello.

Pin-baste to distribute the difference, then stitch to baste the edges, about a scant 1/4" from the edge.  

Repeat the process for the sides.  Smooth out quilt body to lie flat, pin to anchor where it needs to be.

Pin-baste again, working in the border to distribute bulk.

Yes.  I stitched over the pins to baste the edges down.  I know.  Naughty.  But I did change the needle to quilt the rest. ;)  

Stitched in the ditch...then quilted feathers and leafy vines to work in the bulk.  The curvy back-and-forth shape is the perfect motif to hide excess border baggage, don't you think?    

The more bulk to work in, the more dense the quilting.  

Success!

Here's another sample:


Silk purse.

Prevention:  Measure, Measure, Measure!

Here's the true solution to borders that wave in the breeze ~ an excerpt from my Preparing Your Quilt for Machine-Quilting DOs and DON'Ts list:

Take the time to accurately measure and apply your borders.  Some things can be "quilted out", however, you will be happier with your results (and save your quilter some angst!) if you take a few extra steps:  
  • Find side dimensions of quilt by measuring lengthwise through the quilt center, (not along the edges, since they may have stretched).  Take three measurements and average them to determine the length to cut your side borders.  Cut both borders the same measurement.
  • Pin  each side border to quilt at the ends and the center, then pin every few inches, easing in any fullness if necessary.  Press seam toward borders.
  • Find top/bottom dimensions of your quilt by measuring across the quilt and side borders.  Cut both borders the same measurement.
  • Attach top and bottom borders to quilt, pinning as you did side borders.  Press seams toward outer edge of quilt.  
    Repeat process for multiple borders.
Happy Quilting!


http://gifgifs.com

Tuesday, December 13, 2011

A Quilt Rescue & Riley Blake Tutorial

This is an antique quilt, made entirely from "Feed Sacks"
(Cotton covers for flour and sugar sacks from 1890 through 1950)
Some of the red check squares still had
a bit of glue and paper from labels.


Are those Gerber Babies?


Quilted with an overall stipple pattern to make the quilt lie flat,
bound in peach shot cotton.  Beautiful. 


Here's another QUILT RESCUE story! Don't you love antique quilts??

What's your opinion of "rescuing" treasures like this,
hidden in cabinets, shelves, old chests, attics everywhere?  

It has me thinking about why we make quilts. 
Little bits of cloth; stories of our lives... 

This quilt inspired my post today
 for Riley Blake Designs' Cutting Corners College.

The topic?  Finishing School ~ Quilt it! (Hints and tips for "Quilting the Quilt")
Now, I need to go and take my own advice!


Come on over ↓↓ and have a look!

Wednesday, June 2, 2010

Rescued


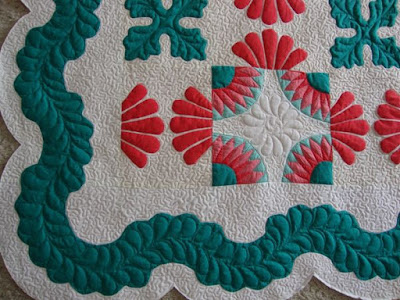
Every once in a while, a client will bring me a quilt top made by a grandmother or great-grandmother that has been sitting in an old chest or box for decades. Maybe they picked it up at an antique shop. The fabrics may be stained or faded, torn or nibbled on by some creature. The seams may be hand pieced together, appliqued, or even machine stitched, but the quilt does not lie flat for some reason.  These quilts are treasures, and deserve the extra care it takes to rescue them and preserve the love and effort that went into making it in the first place.


I just finished quilting one of these quilts. In this case, it was made by the woman's grandmother 50 or 60 years ago, and she wanted to give it to her mother.  It had been pretty stained and she washed it to get out the stains, which ended up shrinking the centers of the pieced blocks, which puckered all the alternating applique blocks.  It was a true rescue effort with a lot of tugging and pulling, a lot of stitching in the ditch, and a lot of "quilting it out."  And now, it's truly a family treasure.

~~~
Update:  I posted this blog on an online Quilter's Board, asking opinions regarding machine-quilting vs hand-quilting antique quilts.  I am  amazed at the response! Click HERE