Search This Blog

Showing posts sorted by relevance for query binding. Sort by date Show all posts

Wednesday, January 7, 2015

Fancy Finishes! Faux-Piped Binding

This month begins a tutorial series featuring edge-finishes and "Alternate Endings" to use on quilts or other quilted projects, other than a standard binding. 

 Binding ~ Faux Piping! 
A quick machine-binding for a fancy finish!

Faux-Piped Binding
Pre-quilted RBD chevrons/dots with solid red and lime pieced binding

Here's a way to pretend you went to all the work of adding piping to your binding without all the effort. "If there's an easier way...", that's my motto. This is also an easy finish for a quick gift. Today's tutorial is loaded with lots of extra TIPS and thorough steps for binding any quilt.

Tuesday, February 1, 2011

BINDING LESSON - Photo Tutorial


A French double-fold cross-grain binding is my favorite method to bind a quilt.

I use 2" strips cut the width of fabric, and join with mitered seams to distribute bulk. The folded binding is stitched to the front side of the quilt using a 1/4" seam allowance, with raw edges aligned (greatest invention ever: 1/4" sewing machine foot!); corners are mitered, and binding is hand-stitched to the back of the quilt. The 2" binding strips with 1/4" seam allowance makes a consistent finished binding width on both front and back of the quilt.


PLEASE NOTE: This method may be applied to ANY width of binding strip. You may need to experiment to find the ideal seam allowance.


1) JOIN BINDING STRIPS. Using the grid on your cutting mat,

lay binding strips end to end, right sides together at a 45-degree
angle, overlapping slightly. STITCH from valley to valley.
TRIM seam allowance to a scant 1/4" then PRESS seams open to
distribute the bulk of seams.


2) FOLD binding lengthwise in half, wrong sides together;
PRESS. Now you are ready to begin.


3) ALIGN raw edges of binding with edges of quilt front.
Leave about an 8" tail.  Begin to STITCH, using 1/4" seam allowance.


4)  Place a PIN 1/4" away (always one seam-allowance width)
from the corner to indicate the stopping point.


5)  STOP stitching about 1 stitch away from pin,
BACK
STITCH.  Remove the quilt and trim threads.


6)  FOLD the binding strip at a 45-degree angle to create
miter.  The raw edges should form a straight line. 


7)  FOLD binding strip back down, even with the next
edge of the quilt.  Fold should be aligned straight with

the previous side.


8)  Begin to STITCH at the edge of the quilt.  BACK-
STITCH to secure, and continue sewing. 
REPEAT at all corners.


9)  After last corner is mitered, STOP stitching about
8" from beginning stitches.


10)  OVERLAP the beginning tail over the ending tail. 
MEASURE about 2/3 of the way through the open space,
then CLIP a 1/8" notch through all four layers of
binding strips.  DO NOT clip quilt.  CUT OFF right
binding tail exactly at clipped notch.


11)  TRIM a little slice from the discarded binding tail to
use as a measuring tool.


12)  OPEN slice of binding and place on trimmed binding,
aligning ends. 


13)  OVERLAP the remaining binding strip, using the slice of
binding to measure, then CUT left binding strip at the
right edge of the measuring strip.  In this case, 2" from clipped notches.

14)  UNFOLD and flatten the right binding tail RIGHT
SIDE UP;  Left binding tail WRONG SIDE UP.
(Remember:  Right side = RIGHT Side, Left side = WRONG side)


15)  FOLD the end of the left binding piece at a 45-degree
angle and crease to find the stitching line. 


16)  MARK, then STITCH on the line .
This is always parallel to the edge of the quilt.


17)  CHECK to make sure binding did not twist,
then TRIM seam allowance.  PRESS seam open.


18)  Re-ALIGN binding with edge of the quilt and STITCH remaining seam. 
PRESS binding away from quilt front.


19)  TURN binding to back of the quilt, forming identical
miters on the back as on the front.  PIN to secure.


20)  HAND-STITCH binding to the back of the quilt. 
Use thread color that matches binding.

Prize-Winning binding every time!!

p.s.  This adorable dragon is adapted from the pattern "Not All Dragons are Scary" <<

p.p.s.  Here are some comments from Cutting Corners:

  1. Great tutorial - I always have to search my magazines to figure out how to do this - I pretty much have the corners figured out, but it's the ending that always trips me up. BTW, what is that wonderful pattern?!?
    by SuzK
    March 08th, 2011 at 11:24 a.m.
  2. Thanks, SuzK, Hope the tute helps! The quilt was designed for last year's Home Machine Quilting Show fabric challenge sponsored by Riley Blake Designs, featuring fabrics from their "Sublime" line. Based on the theme "Every Quilt Has a Story", the little dragon is adapted from Allicia Politis' pattern called "Not All Dragons are Scary." My friends and I won 3rd place in the challenge, and won some great friends here at Riley Blake!
    by Deonn
    March 08th, 2011 at 12:16 p.m.
  3. Thanks so much for this! I am wondering about the hand-stitching... do some people machine stitch it to get a nice top-stitch, or is it always done by hand?
    by Jen Allyson
    March 08th, 2011 at 8:20 p.m.
  4. Good question, Jen! This process works great with machine stitching too! For best results, I apply the binding to the BACK of the quilt, then bring the binding around to the front to machine stitch closed. Edge stitch, or try a decorative or serpentine stitch. Mitered corners still work beautifully!
    by Deonn
    March 08th, 2011 at 9:59 p.m.
  5. This was really very helpful. I love the way you cut that piece to use as a measure when you were ending the binding.
    by Jean
    March 12th, 2011 at 7:16 a.m.

    AND MORE COMMENTS from Cutting Corners College:
    1. You make it look so easy!!!  I will be binding my next quilt, I hope I can remember your tute. Thanks a million!! Linda
      by Linda
      April 16th, 2012 at 9:29 p.m.
    2. Linda, the link to printer friendly instructions is just below the finished quilt picture. Thanks, Deonn! Great instructions. :)
      by Elizabeth
      April 16th, 2012 at 10 p.m.
    3. Does it matter how much of the binding you cut off the discarded binding tail? I'm not quite sure what you are using this to measure. Otherwise great tutorial.
      by Robin in Alaska
      April 16th, 2012 at 10:07 p.m.
    4. Great tutorial,my qestion is the same like Robin's in Alaska,thank you
      by Miriam
      April 16th, 2012 at 10:51 p.m.
    5. Where can I get this lovely pattern?
      by Deborah
      April 17th, 2012 at 12:25 a.m.
    6. I just adore the dragon he is so beautiful. Is there a pattern for him anywhere? Your instructions are vey clear thank you.
      by sandra
      April 17th, 2012 at 3:37 a.m.
    7. Hi Deonn, Tutorial is the best ever help. Thank's a million. I'd love to make this for my son, can I get the pattern anywhere in Ontario?
      by SUSAN
      April 17th, 2012 at 5:08 a.m.
    8. Like stated before, your instructions are very clear and will take the fear out of binding for alot of us.
      by Gordia Prince
      April 17th, 2012 at 5:46 a.m.
    9. I agree, very clear and precise. You took the fear factor out of the picture for me!
      by Carol
      April 17th, 2012 at 8 a.m.
    10. I love your quilt! That is exactly how I do my bindings--I like the tip on folding the seam allowance at the end to get the stitching line!
      by Kathy Clarke
      April 17th, 2012 at 9:51 a.m.
    11. Thank you so much, I am going to try it your way next time
      by Charene
      April 17th, 2012 at 10:08 a.m.
    12. What are the latex gloves for? I see them pictured in only one photo.
      by Fran
      April 18th, 2012 at 3:40 p.m.
    13. With the right sewing machine and lots of patience you can do it. I have done this and more and I didn't have experience before.
      by Dewey Kearney
      April 30th, 2012 at 10:26 a.m.
    14. Thanks very much for this great tutorial. I tried it yesterday and it works out just fine. It's really magic! Greetings from Germany Birgitt
      by Birgitt
      May 22nd, 2012 at 4:52 a.m.
    15. Thank for the very well detailed instruction
      by Vedette
      June 20th, 2012 at 11:53 a.m.
    16. It has been awhile since I visited this tutorial to see comments and answer questions. Final joined seam: The piece cut off at the end becomes the measuring tool to add the exact width of the binding strip. In this case, the strips were 2" wide, so I added 2".

      Dragon pattern: This is an adaptation of a pattern called "Not All Dragons Are Scary" by Allisha Politis and can be purchased online HERE: http://bit.ly/XRKmne

      The latex glove on my left hand helps me grip the quilt when adding binding, and relieves the tension in my hand, arm and shoulder. Works like a charm!
      Happy Binding! ~Deonn
      by Deonn
      February 07th, 2013 at 6:03 a.m.
    17. I have struggled with this for awhile. This is the best tutorial EVER!!! Even with the faux piping! Thanks!
      by Tlo 
      April 15th, 2015 at 5:39 a.

Monday, February 14, 2022

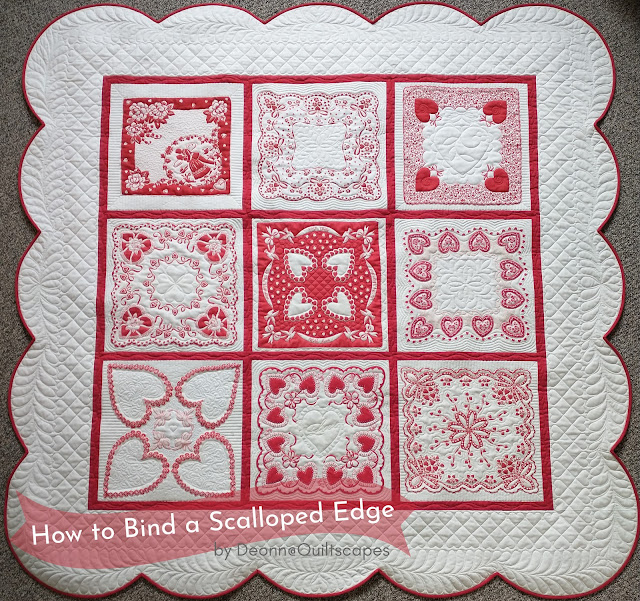
Tutorial ~ How to Bind a Scalloped Edge

Love is in the air!  This "LOVE-ly" gorgeous quilt was made with vintage Valentine handkerchiefs by my quilt customer, Shawn T.  She always has wonderful, creative ideas, and this was no exception!  

Sunday, April 25, 2010

Binding Lesson -- Mastering the Final Joined Seam

A binding can make or break a beautiful quilt. 


Here's a slick way to join the final seam when applying binding to a quilt.  This tutorial uses 2" cross-cut double-fold binding strips, joined with mitered seams to distribute bulk.  Binding is applied to the right side of the quilt with raw edges aligned with the outer edges of the quilt, and corners are mitered. 
(PLEASE NOTE: This method may be applied to ANY size binding.)


STEP 1:  Leave about an 8" tail of binding free at the beginning, then leave an open space of about 8" to 10" between the beginning and ending of your binding, and another 8" tail free at the end.


STEP 2: Lay the RIGHT binding tail over your quilt, being careful not to pull or stretch, and aligned with the raw edges of the quilt. CUT it off a little more than halfway over the open space. 


STEP 3:  From the extra tail you just trimmed, SLICE off 1” to use as a measuring tool.


STEP 4:  Open out the segment you just trimmed off, and lay it out on your Right binding tail, aligning the ends, and overlapping about 1/2” above the binding. 


STEP 5:  Now lay the LEFT binding tail over the Right binding tail, smoothing it out, but again not stretching or pulling, and align with the raw edges of the quilt. You should be able to see your measuring strip between the binding strips.  CUT the Left binding tail exactly where the measuring strip ends.  

STEP 6:  Unfold and flatten the RIGHT binding tail with the printed side of the fabric right side up.  Unfold and flatten the LEFT binding tail with the right side of fabric facing down.


STEP 7:  Fold the Left binding piece at a 45-degree angle and crease to find the stitching line. 


STEP 8:  ALIGN and match binding ends with right sides together with the Left strip perpendicular to the right strip, forming a “V”.   Pin and STITCH on the creased line.


STEP 9:  Check to make sure your binding lies flat, and did not get twisted somehow.


TRIM the excess seam allowance and PRESS seam OPEN which helps to distribute the bulk of the seam allowance.


STEP 10:  Realign binding strip with raw edge of quilt, and finish stitching up the remaining seam for a continuous binding.


STEP 11:  Turn binding to the back of the quilt, press, then HAND-STITCH using thread the same color as your binding.

Monday, May 4, 2015

Fancy Finishes: Curvaceous Binding! (+ Bias Binding Tutorial)

There are times when a quilt calls for a fancy, curvy edge!

Fabric:  "Romancing the Past" by Sue Daley for Penny Rose Fabrics,
a division of Riley Blake Designs

Here's a little tutorial about how to achieve long, smooth curves when applying binding to a curved border. 

Prepare the Quilt
Now, sometimes all a quilt needs is a little curve around the corners.  I like to add a little dip after the curve, not much, about a 1/2" dip, with straight binding in between.  It somehow frames the quilt without a whole lot of effort, and looks so sweet!  


First, MARK your desired curves using a removable marking pen.  My favorite is an iron-off Pilot Frixion pen.  Use a circle template/ruler or grab a bowl, plate or pan lid to mark the curves.  

You can get really scientific about it, calculating the length of the border, then dividing by the number of curves or scallops so they're all distributed equally, or simply start from the corners and work your way to the center.  You can smooth out the curves or bring them to an inner point for scallops.  OR you can simply follow the print of the fabric, as pictured below:

↑↑ Check out that perfectly curvy shadow!

In this case, I fussy-cut and pieced the border fabric, then centered each border on the quilt and mitered the corners (<< click to see tutorial).  

Be sure to MARK the scallops or curves on the quilt prior to quilting.  Then, BASTE the quilt right on the marked lines.  Once quilted, TRIM the quilt a scant 1/4" from the marked/basted line.  Now you're ready to bind!

Prepare French Double-Fold Bias Binding
Determine the amount of fabric needed for your quilt.  I use a minimum of 5/8 yard, which produces 30" strips when cut on the bias, and yields enough bias binding for a full size quilt. If my quilt is smaller, I'll just save the extra for another project.  

Here's a chart for yardage needed to produce 2" binding strips.  Any larger than 2" strips for the binding will make it a little more "klunky" - that is, less smooth around the curves.

BIAS BINDING YARDAGE CHART
Crib size (40 x 54")      1/3 yard
Twin (63 x 87")           1/2 yard
Full ( 78 x 87")            5/8 yard
Queen (84 x 92")         3/4 yard
King (100 x 102")         7/8 yard
Note: 5/8 yard will produce fifteen 2" wide x 30" long strips.  That's about 450 linear inches of binding yardage!

Prepare your binding as indicated in this Bias Binding Tutorial.
First, TRIM off selvages and SQUARE UP binding yardage.
1)  Lay out fabric wrong side up, selvage edges at the sides.  FOLD left corner up to the top edge at a 45-degree angle.  Allow selvage edge to overhang by about 5/8".  Finger press to crease.


2)  CUT on folded line
3)  Unfold the cut triangle and MOVE the piece to the opposite end of fabric.  PIN selvage edges, right sides together.


4)  STITCH using a 1/4" seam allowance.  PRESS seam open.  Your binding piece should now resemble a parallelogram.
5)  Next, FOLD the upper left point of fabric down along the diagonal cut edge, keeping raw edges aligned.  Repeat on the opposite side by folding the lower right point up along the diagonal edge.  Keep folding into a roll as needed to fit on your cutting mat.


6)  ROTATE and ALIGN the folded roll along a horizontal line on your cutting mat. TRIM end evenly, then SLICE into 2" segments.


7)  JOIN strips right sides together, end to end, and STITCH from valley to valley as pictured.  A diagonal seam will help to distribute the bulk and reduce lumps in your binding. :)
8)  TRIM seams to a scant 1/4”; PRESS seams open.  PRESS binding in half, lengthwise, then fold to store until needed.  See video HERE.

9) STITCH binding to the quilt front, aligning raw edges together.  For best results, stretch the binding slightly on inner curves, and ease around outer curves.  Use a stiletto or your fingers to help ease the binding under the needle, especially around tight curves.

Ease around the outer curves
10)  JOIN binding ends together with a final diagonal seam.  It works best if you pick a gentle slope to create that final mitered seam.  TRIM (yes, I use pinking shears to help reduce even more bulk), PRESS seam open, then refold and continue stitching, overlapping the beginning stitches.

Miter the final seam for a continuous binding
11)  FOLD binding around to the quilt back, then HAND-STITCH to finish, matching thread with the binding.

Hand-stitched finish

Fabulous!
Pattern is now available on my Etsy store!  ↑ Click for the link.  Want to be notified of more "Quiltscapades"?  Subscribe via email (sidebar), follow Quiltscapes on facebook, or send an email (deonn@quiltscapesqs.com).
 
P.S.  Here are a few links referenced in this tutorial:
Bias Binding (video)

Binding Basics (final mitered seam)
Binding Storage (video)
Mitered Borders Tutorial