
Thank you for joining me for this "Cutting Corners" tutorial for Riley Blake Designs! Learn some terrific tips for cutting and using Bias Binding! Plus, bonus instructions to make your own Bias Tape!

Bias Binding: PRINTER FRIENDLY INSTRUCTIONS
Here is my favorite "cinnamon roll" method to make bias strips.
Use whenever you need to bind a curve on any unfinished edge: quilt, jacket,
armhole, apron, or make your own bias tape.
Use whenever you need to bind a curve on any unfinished edge: quilt, jacket,
armhole, apron, or make your own bias tape.
COURSE SUPPLIES for QUILT BINDING:
- Rotary Cutting Supplies: Mat, Ruler, Rotary Blade
- Fabric: Binding gives a defining edge to your quilt or garment. I recommend using tone on tone, solids, or small motif, check, stripe or plaid. Basically, avoid large prints, extremely wide stripes or florals for best results.
BIAS BINDING YARDAGE CHARTCrib size (40 x 54") 1/3 yard
Twin (63 x 87") 1/2 yard
Full ( 78 x 87") 5/8 yard
Queen (84 x 92") 3/4 yard
King (100 x 102") 7/8 yard
Note: 5/8 yard will produce fifteen 2" wide x 30" long strips. That's 450 linear inches of binding yardage!
INSTRUCTIONS:
1) SQUARE UP fabric perpendicular to the selvage edge. FOLD fabric in half and match up selvages. ALIGN the fold of your binding fabric along a line on your cutting mat. TRIM cut edges.

2) LAY OUT fabric, wrong side up. FOLD left corner up to cut edge at a 45-degree angle. Allow selvage edge to overhang by about 5/8". PRESS, or finger-press to crease.

3) CUT on folded line.

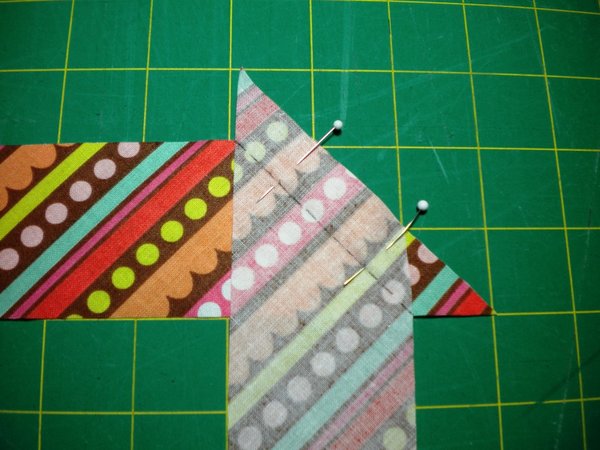
4) MOVE cut piece to opposite end of fabric; PIN selvage edges, right sides together.

5) STITCH using about a 5/8" seam allowance, enough to trim off selvages. TRIM seam, PRESS seam open.
6) FOLD your parallelogram in half, then FOLD point of fabric down along cut edge, keeping fabric even. Keep folding into a roll as needed to fit on your cutting mat.


7) ALIGN folded roll along a horizontal line on your cutting mat.

8) TRIM end, then SLICE into 2" strips.

8) JOIN strips right sides together, end to end, and STITCH from valley to valley. Because you squared up your fabric at first, you should have 45-degree angles on the ends of your strips.
9) TRIM seams, PRESS seams open.

10) PRESS binding in half lengthwise.

11) FOLD pressed binding into a figure eight, tuck ends and store until needed. See video:
12) PULL binding from the middle to use without getting twisted or tangled.

TIP: For best results when applying binding to curves, stretch it a little on inner curves, and ease around outer curves. Beautiful!

For more binding information and application, see my BINDING BASICS tutorial.
~~~
MAKE YOUR OWN BIAS TAPE:
Use the same method as above to cut strips to make bias tape. There are lots of bias tape-maker gizmos and gadgets on the market, but here is a tried and true do-at-home method to make your bias strips any size you'd like.

1) CUT your bias strips.
For example: 1" bias strips = 1/2" finished flat bias, or 1/4" folded bias tape.
For example: 1" bias strips = 1/2" finished flat bias, or 1/4" folded bias tape.
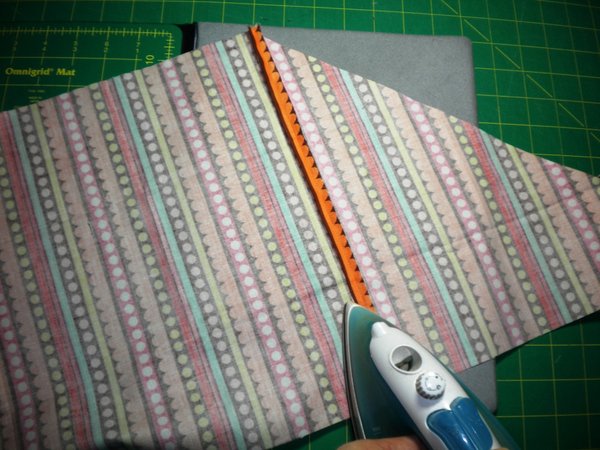
2) Place a PIN through your ironing board cover leaving a space as wide as you'd like the finished size. Add a second pin to the side, with enough space for the tip of the iron to press. The fabric should be about twice the width of that space.
3) STARCH bias strips, then PRESS as you gently pull the strips between the pins, being careful to keep your edges folded.
Use to create vines for applique, to bind seams, or use for other decor.


Hope you learned some fun tips in this tutorial! If you have questions, please leave a comment or email a note I'd love to hear from you!


Comments from RBD
August 04th, 2012 at 9:31 a.m.
August 05th, 2013 at 4:32 a.m.
November 30th, 2013 at 9:01 a.m.