I spend a LOT of time in my sewing room. Maybe a little too much time, you be the judge. I especially love pincushions... chicken pincushions.
Right now, it's awful quiet around here...

...nobody here but us Chickens...
You may have seen these gals floating around the internet on Pinterest,
with a few appearances over on Quiltscapes;
with a few appearances over on Quiltscapes;
even a sighting in the middle of a recent RBD video tutorial!
I call them my "Hen Party Chicks."
You've got to admit, they're adorable ~ Don't they just make you smile?!
You've got to admit, they're adorable ~ Don't they just make you smile?!
I think everyone should have a basketful of these cheerful chicks.
Printable Instructions HERE
Today, instead of using Prairie Points for the beak, comb and tail,
let's try something new with some of Riley Blake's fun notions!
"If there's a simpler way..." (that's my motto!)
let's try something new with some of Riley Blake's fun notions!
"If there's a simpler way..." (that's my motto!)
~ Supply List ~
*Two 3-1/2” to 5” squares fabric for chick body
(cotton, upholstery fabric, pre-quilted fabric, etc.)
(cotton, upholstery fabric, pre-quilted fabric, etc.)
*A bit of Jumbo Rick-Rack for tail feathers, beak, comb.
*About 1 cup rice, ground walnut shells, silica sand,
or use polyester fiberfill for stuffing (your choice).
or use polyester fiberfill for stuffing (your choice).

~ Instructions ~
PREPARE comb and beak pieces:


CUT one section of rick-rack for beak, FOLD in half, TRIM.
CUT one section of rick-rack for comb, TRIM.
LAY OUT one of the chick body squares right side up,
and ARRANGE beak and comb pieces as ↓ pictured.

PIN- or GLUE-baste to secure beak and comb in place.
PLACE the other square right sides together over the comb and beak.

Pin in place, then STITCH along the lines indicated,
using 1/4” seam allowances.
using 1/4” seam allowances.
Start in the corner opposite the beak and comb.
Leave an opening at the bottom through which
you will be able to turn the chicken right-side out.
Leave the last side OPEN. Set aside.

PREPARE tail pieces. PIN- or GLUE-baste pieces together.

SANDWICH your tail piece in the remaining open seam of the chicken:


Align the top and bottom seams and center the tail.


This will form the pyramid shape of the chicken.
PIN, then STITCH across that seam.

TRIM.

TURN your chicken right side out through the opening.
(Hatch your chick!)
STUFF with your choice of filling;
HAND-STITCH the opening closed.

Sew on some little beads or poke a couple of pins in the right spot for eyes.
Spring Chickens!

Fabric: "Daisy Cottage" by Lori Holt (Bee in my Bonnet) for Riley Blake Designs
Love these fabrics, and the soft cotton jumbo rick-rack worked great!

↑ Tried folding rick-rack for the comb, too. So cute, makes me smile.
Hmmm, that gives me an idea...

↑↑ what was THAT??
WHAT IF... I lowered the beak about halfway down...
Nope, didn't look right. Had to rip it out.
HOW ABOUT... a double beak. OK, I think that will work...

Stitch squares together along one side, enclosing beak.

{Tee hee}
Hmmm... WHAT WOULD HAPPEN IF...
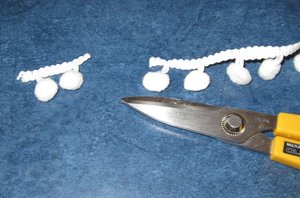
I added a couple of Pom-Poms in the seam, too. Rip it out again.

HOW ABOUT IF... I stitched a little Ultrasuede eyebrow...

{Heh heh...}
Now add a couple of folded comb pieces....
Finish the other seams...

{Chuckle}
Add the rick-rack tail,
Turn him inside out...
{Giggles}
Fill with rice, Stitch him closed.
Add a couple of little pins for the eyes...

{Hahahaha! Snort...}
Look what Momma made!
Oh, my goodness, it's a..... a.....
FOUL FOWL!!!
{wiping off tears...}
OK, guess you had to be here... :)
Pincushion? Beanbag? Hackey-Sack?
Won't these be fun for Easter?
Oh... what about a bunny?

Uh... No.
Let's just stick to Chickens, and we'll have a Hen Party!
...and what is THAT ?!? ↓↓

Hope this tutorial helped you get started on your own batch of these Spring Chickens!
And that little mystery chick that snuck into my picture?
Stop by Quiltscapes to see him, and all his little friends...
Stop by Quiltscapes to see him, and all his little friends...
Be sure to join me on the 2nd Monday of each month for Quilting Basics
tutorials right here on Cutting Corners College.
Until then, Happy Sewing!


Comments from RBD

March 05th, 2012 at 6:37 p.m.
March 06th, 2012 at 10:16 p.m.
March 15th, 2012 at 10:28 a.m.
March 18th, 2012 at 2:44 p.m.
March 31st, 2012 at 11:50 p.m.
July 04th, 2012 at 11:32 a.m.
August 31st, 2012 at 9:31 p.m.
September 19th, 2012 at 4:19 p.m.
January 02nd, 2013 at 12:54 a.m.
February 04th, 2013 at 2:27 p.m.
May 08th, 2013 at 8:18 a.m.
November 27th, 2013 at 8:06 a.m.
November 30th, 2013 at 4:48 a.m.