

Log Cabin Tree Tree Skirt & Ornaments by Deonn Stott, sewn by Debbie Proctor
featuring Comfort & Joy fabrics by Dani Mogstad for Riley Blake Designs
{{Update: Log Cabin Tree ~ Quilted Tree Skirt & Ornament pattern is now available!
Click HERE for a digital copy, and HERE for the paper copy.}}
{{Update: Log Cabin Tree ~ Quilted Tree Skirt & Ornament pattern is now available!
Click HERE for a digital copy, and HERE for the paper copy.}}
I am happy to be participating in this fun blog tour - and even happier to have collaborated with my quilting friend Debbie for this project.
When thinking of what we could make with these sweet fabrics, Debbie showed me a tree skirt her mother had made for her, a Diamond Log Cabin Tree Skirt by Eleanor Burns, circa 1988.

Her mother had made both the tree skirt and a tablecloth, then used the scraps to make little matching log cabin ornaments.

She even signed them, which, now that "Grandma Gardner" is gone, makes these a treasure for her family. So sweet.

I loved the idea of the log cabin-style project, because it could feature more of these adorable prints. Then the thought occurred to me to try a tree-shaped log cabin configuration, starting with a triangle instead of a square for the center.
I checked my AccuQuilt dies and sure enough, there was an equilateral triangle die in my collection, #55429. Yay! Perfectly trimmed corners, notches for the centers, and you can cut 6 layers at the same time. Debbie had a die cut with mini triangles which we used for the mini tree ornaments, plus some strip cutters which made quick work of cutting our strips. Traditionally, a log cabin quilt block begins with a red square to signify hearth and home, so... red triangles became the center of our trees.

It's a 60-degree triangle, and as most rulers have that marking, it's an easy triangle to rotary cut as well. Decide how tall you want the triangle and cut a strip 1/2 inch wider. Then, just line up the 60-degree mark along an edge to make the first cut.

Turn the ruler around to find the next angle, then repeat.


We also decided that with these prints, we could give a little dimension to the tree with the light prints on one side and medium prints on the other. Debbie made all the blocks.

Finally, after taking family surveys of our background choices, the modern, clean look won out and we went with Riley Blake Swiss Dot tone on tone White:
RED: 3 vs WHITE: 5
(We didn't count Debbie's two sons' votes, because they are both color blind!) The red seemed to look better in pictures, but the white really does look best in person!

Once the quilt top was made, it was time for quilting! I quilted branches into the tree, switching direction at the center seamlines.


Then I couldn't help it, I had to quilt some little gifts under the trees... I think these would be super cute if done as applique'!

Then some easy swirls between the trees. To me, it looks like a big snowflake and the swirls could be, well, snow? snowballs? At any rate, it will eventually get covered up with presents anyway, right?

To me, the toughest part of the whole project is making myself cut a slice and center hole so the tree skirt can fit around a tree! Whew!


Bias binding around the center hole with long enough ties to tie around the trunk.

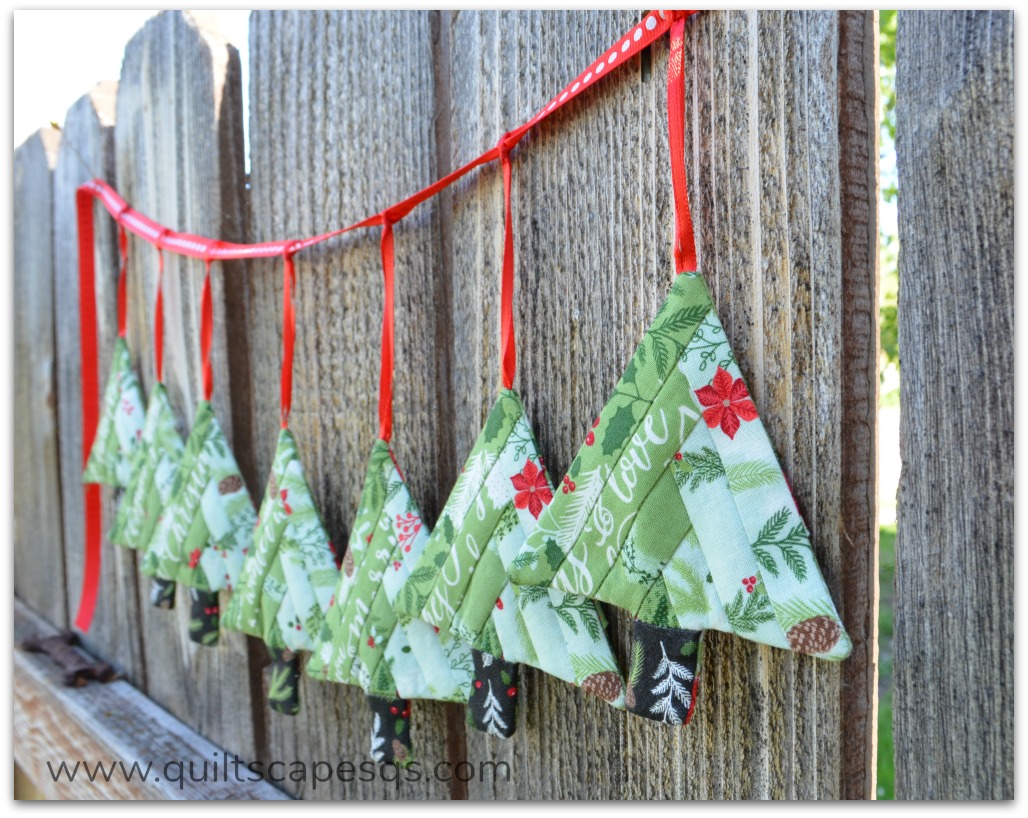
Then, like Grandma Gardner, we used scraps from the tree skirt to make little matching ornaments. (See ornament tutorial HERE.)

All set for Christmas! And just so Debbie and I don't have to draw straws, of course we'll have to make another one ~ It went together so fast, it will be a breeze! Now we are kinda giggling about calling it a "Tree Tree Skirt". If you have any other suggestions, let us know!

Big thanks to the folks at Riley Blake Designs for sponsoring this project, and thanks to you for stopping by! Find the complete pattern HERE (printed copy) or HERE (digital).
For more inspiration to put you in the Holiday spirit, visit the following blogs:
May 22: Julia @ Riley Blake Designs
May 30: Deonn @ Quiltscapes
June 5: Andy @ A Bright Corner
June 17: Amy @ Ameroonie Designs
Wow! This is gorgeous! Your quilting is amazing!
ReplyDeleteThe tree skirt is so pretty! Beautiful fabric.
ReplyDeleteI love this! Thanks for the tutorial too! How wide did you cut the strips for the trees?
ReplyDeleteThank you again!
Your tree skirt is so cute and so are the ornaments! Love them!
ReplyDeleteThat is just gorgeous. Every part of it is perfect - the idea, fabrics, quilting and construction.
ReplyDeleteWhat a wonderful tree skirt with such cute matching ornaments. Good job! Would you mind if I shared you tutorial on my blog when you get it done?
ReplyDeletewhat an amazing tree skirt and so good you shared how you made it . Good to see a blog from you as not seen one for a while now, though I too have been negletful on mine though check everyone else`s daily
ReplyDeleteThis tree skirt is sooo cute!! And your quilting just takes it over the top! Love everything about it :)
ReplyDeleteAmanda
Your tree skirt is gorgeous and the quilting you did is amazing!
ReplyDeleteSuper cute!
ReplyDeleteThanks for all of the information..Love it I plan to make( one tree ) as a door decoration instead of a tree skirt to give as a gift.
ReplyDeleteYour tree skirt is gorgeous and the quilting you did is amazing!
ReplyDeletesbobet
ทางเข้า sbo
ทางเข้า sbobet
I have made several of these and they sell like crazy. I am thinking of making one but increasing the width of the strips to 2 inches for my family who are currently marooned in Melbourne Australia. If they can't get out before Christmas it will be a sad Christmas for them this year.
ReplyDeleteThank you
ReplyDeleteBeautiful! What size is this?
ReplyDelete