Welcome to today's Cutting Corners tutorial, sponsored by Riley Blake Designs!

Gathering with E-L-A-S-T-I-C today!

Here's a slick little tutorial to continue my sewing basics series, "Shall We Gather?"
And just in case you missed the previous lessons, see Lesson I for tips on creating beautiful gathers with your sewing machine. Lesson II teaches the fun vintage art of Smocking.
Today, we'll take a brief look at the use of regular old elastic, try a little bit of elastic ribbon, then we'll use elastic thread for another great vintage technique: Shirring!

At the end of today's lesson we'll make a sweet little dress with this technique.
Supplies:
Fabric swatches, 1/4" elastic, RBD elastic lace ribbon, elastic thread.
(See list below to make the shirred summer dress)
Instructions: Gathering with Elastic.
1) Direct Application.
Cut a piece of elastic the size you want. Pin or baste one end of the elastic to the wrong side of fabric at the beginning edge.
S-t-r-e-t-c-h the elastic to the other side of fabric. Relax the elastic a bit, taking up a few little gathers if necessary, then begin stitching.
Cut a piece of elastic the size you want. Pin or baste one end of the elastic to the wrong side of fabric at the beginning edge.
S-t-r-e-t-c-h the elastic to the other side of fabric. Relax the elastic a bit, taking up a few little gathers if necessary, then begin stitching.
Hope for the best as you try to a) keep the elastic straight, b) keep your stitches even and straight, and c) make it to the end without running out of elastic. Good luck with that!


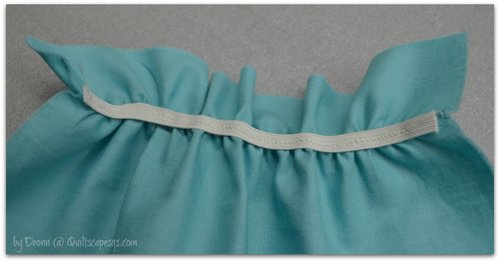
Next, we'll try the same technique with this pretty little Riley Blake elastic lace ribbon. Use a zig-zag stitch through the center of the lace.
Apply elastic lace to the front of the garment to create fun look. Use around a cuff, collar or neckline.
Apply elastic lace to the front of the garment to create fun look. Use around a cuff, collar or neckline.

Most common problem with both these techniques? Running out of elastic before you reach the end. Especially if the fabric where you're applying the elastic is more than 2 X wider than the elastic.
2) Gather with Casing.
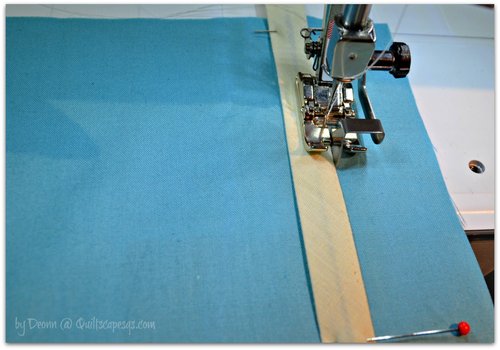
Fold over an edge of fabric and stitch a channel to feed the elastic through, or create a casing with another piece of fabric. In this case, I used single-fold bias tape.
Fold over an edge of fabric and stitch a channel to feed the elastic through, or create a casing with another piece of fabric. In this case, I used single-fold bias tape.

I like using my edge-joining foot then move the needle position to get a close, even, straight stitch.
Thread elastic through casing using a bodkin or safety pin. Tip: Attach a pin to both ends of elastic to prevent pull-throughs!

Pin into place, then baste along edges to secure until enclosed into a seam.

3) Shirring. OK, now we'll use elastic thread for the next technique, definitely the easiest approach for gathering with elastic.

Look for this product near the elastic section in fabric stores. Experiment to find which brand works best in your machine. The elastic thread is wound on the bobbin, with regular thread stitched on the right side of fabric. Use this application for gathers at a waistline, neckline, cuffs, bodice, anywhere!
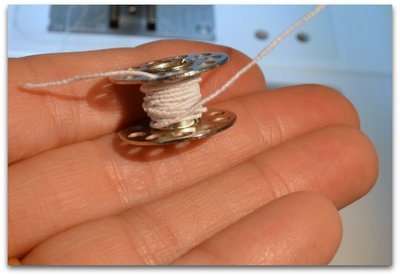
Wind elastic thread on bobbin. Don't overstretch, but don't wind too loosely, either.
I tried both winding by hand...

...then with the bobbin-winder directly from the spool without lacing through the tension guide. Worked great on the Bernina, which has a front-load bobbin case.

Bring up elastic thread, just as you would for regular bobbin thread. Be sure to leave a good size tail for starts and stops.

Adjust stitch length for a longer stitch, about 3.5.
Work on a flat piece of fabric for best results. * Determine where you'd like your stitches to start, then begin stitching on the right side of fabric. Elastic thread will be on the back side.
Backstitch a couple of stitches, just as you would do at the edge of any garment seam.
Stitch in straight rows, 1/4" to 1/2" apart. (Easy to do if your print has a pattern or line to follow, such as RBD Cotton Gingham prints!) Mark lines on the fabric, or use the edge of your presser foot to gauge the distance. Try using your seam guide bar attachment on the presser foot for consistent spacing.
Flatten the fabric in front of the needle so it doesn't stitch unnecessary pleats.

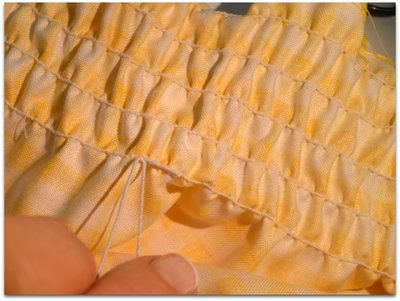
When you get to the end of a row, pivot the needle and travel to the next row. Continue until you have the number of rows or width of shirring desired. Example: 2-3" for a waistline or cuff, 1-2" for a neckline, 6-8" or more for a bodice, etc.

Troubleshoot:
?? What if the bobbin runs out in the middle of a row?
?? What if the bobbin runs out in the middle of a row?

Clip the threads, wind a new bobbin, then continue stitching, overlapping the end of the previous stitches about 1/2". You could also tie a knot in the elastic if you wish.

?? What if it doesn't look like it's doing much gathering?
The more rows added, the more the gathers will tuck in. Once the shirred rows are stitched, use an iron with a steam setting to shrink down the elastic. Be careful not to flatten the shirring as you press. If you don't have a steam iron, spray a little mist then lightly press. The elastic will shrink the stitched area to about half of its original measurement.
Now, let's make a Sweet little One-Seam Shirred Gingham Summer Dress!

Supplies:
* Gingham print with squares measuring 1/4"
* Matching Thread
* Elastic Thread
* Elastic Lace or other ribbon for straps
* Matching Thread
* Elastic Thread
* Elastic Lace or other ribbon for straps

Instructions:
Calculate size:
Measure chest of person for whom you are making this sundress, then double that measurement, plus 1" for the back seam. That is the width measurement.
Measure from armpit to length desired. Add 1/2" for top hem plus 2-1/2" for bottom hem. That is the length measurement.
Measure chest of person for whom you are making this sundress, then double that measurement, plus 1" for the back seam. That is the width measurement.
Measure from armpit to length desired. Add 1/2" for top hem plus 2-1/2" for bottom hem. That is the length measurement.
1) Clean-finish side seam edges (short sides) using serger or zig-zag stitch.

2) Finish top hem. PRESS top edge under 1/2". Tuck raw edges inside fold and press again. Edge-stitch by machine to finish.

3) Bottom Hem: PRESS bottom edge under 1/2". You will finish hem after dress is fitted.
4) Shirring: Beginning 3/4" down from the top edge, stitch horizontal rows using elastic thread as described in the steps above, as many as desired. Backstitch at the beginning and ending; clip threads.


4) Shirring: Beginning 3/4" down from the top edge, stitch horizontal rows using elastic thread as described in the steps above, as many as desired. Backstitch at the beginning and ending; clip threads.

5) Fold shirred fabric right sides together. Match print or plaid, and stitch center back seam, using 1/2" seam allowance.

Lightly press the seam open.

6) Using a steam setting on the iron, steam shirred areas to shrink down elastic. Do this around the perimeter of the dress.

8) Turn up the hem; pin in place. Hand- or machine-stitch to finish.

Happy Sewing!


June 03rd, 2014 at 10:40 a.m.
June 03rd, 2014 at 12:43 p.m.
July 21st, 2014 at 5:18 a.m.
August 17th, 2014 at 11:42 a.m.